> ## Documentation Index
> Fetch the complete documentation index at: https://docs.shaktistudio.ai/llms.txt
> Use this file to discover all available pages before exploring further.
# Creating a Deployment
> Steps to guide you through the process of creating a Deployment
Deployments are scoped to the active workspace. Use the workspace toggle in the breadcrumb navigation to switch workspaces before creating a deployment. See [Workspaces](/model-suite/settings/workspaces) for details.
## **Initiate New Deployment**
From the main menu, select the [**Deployments**](https://uat-infer.shakticloud.ai/deployments) tab
* Click on the **Create** button to start a new deployment
* **Enter Deployment Name**: Provide a unique name for your deployment.
* **Select Cluster**: Choose the cluster where you want to deploy your model.
* **Select Model**: Choose the model you want to deploy from the list.
For all your Private Deployments, select **Shakti Studio** as the cluster.
 ## **Configure Infrastructure (Resource Details)**
* Choose the appropriate accelerators for your deployment, such as GPUs/CPUs.
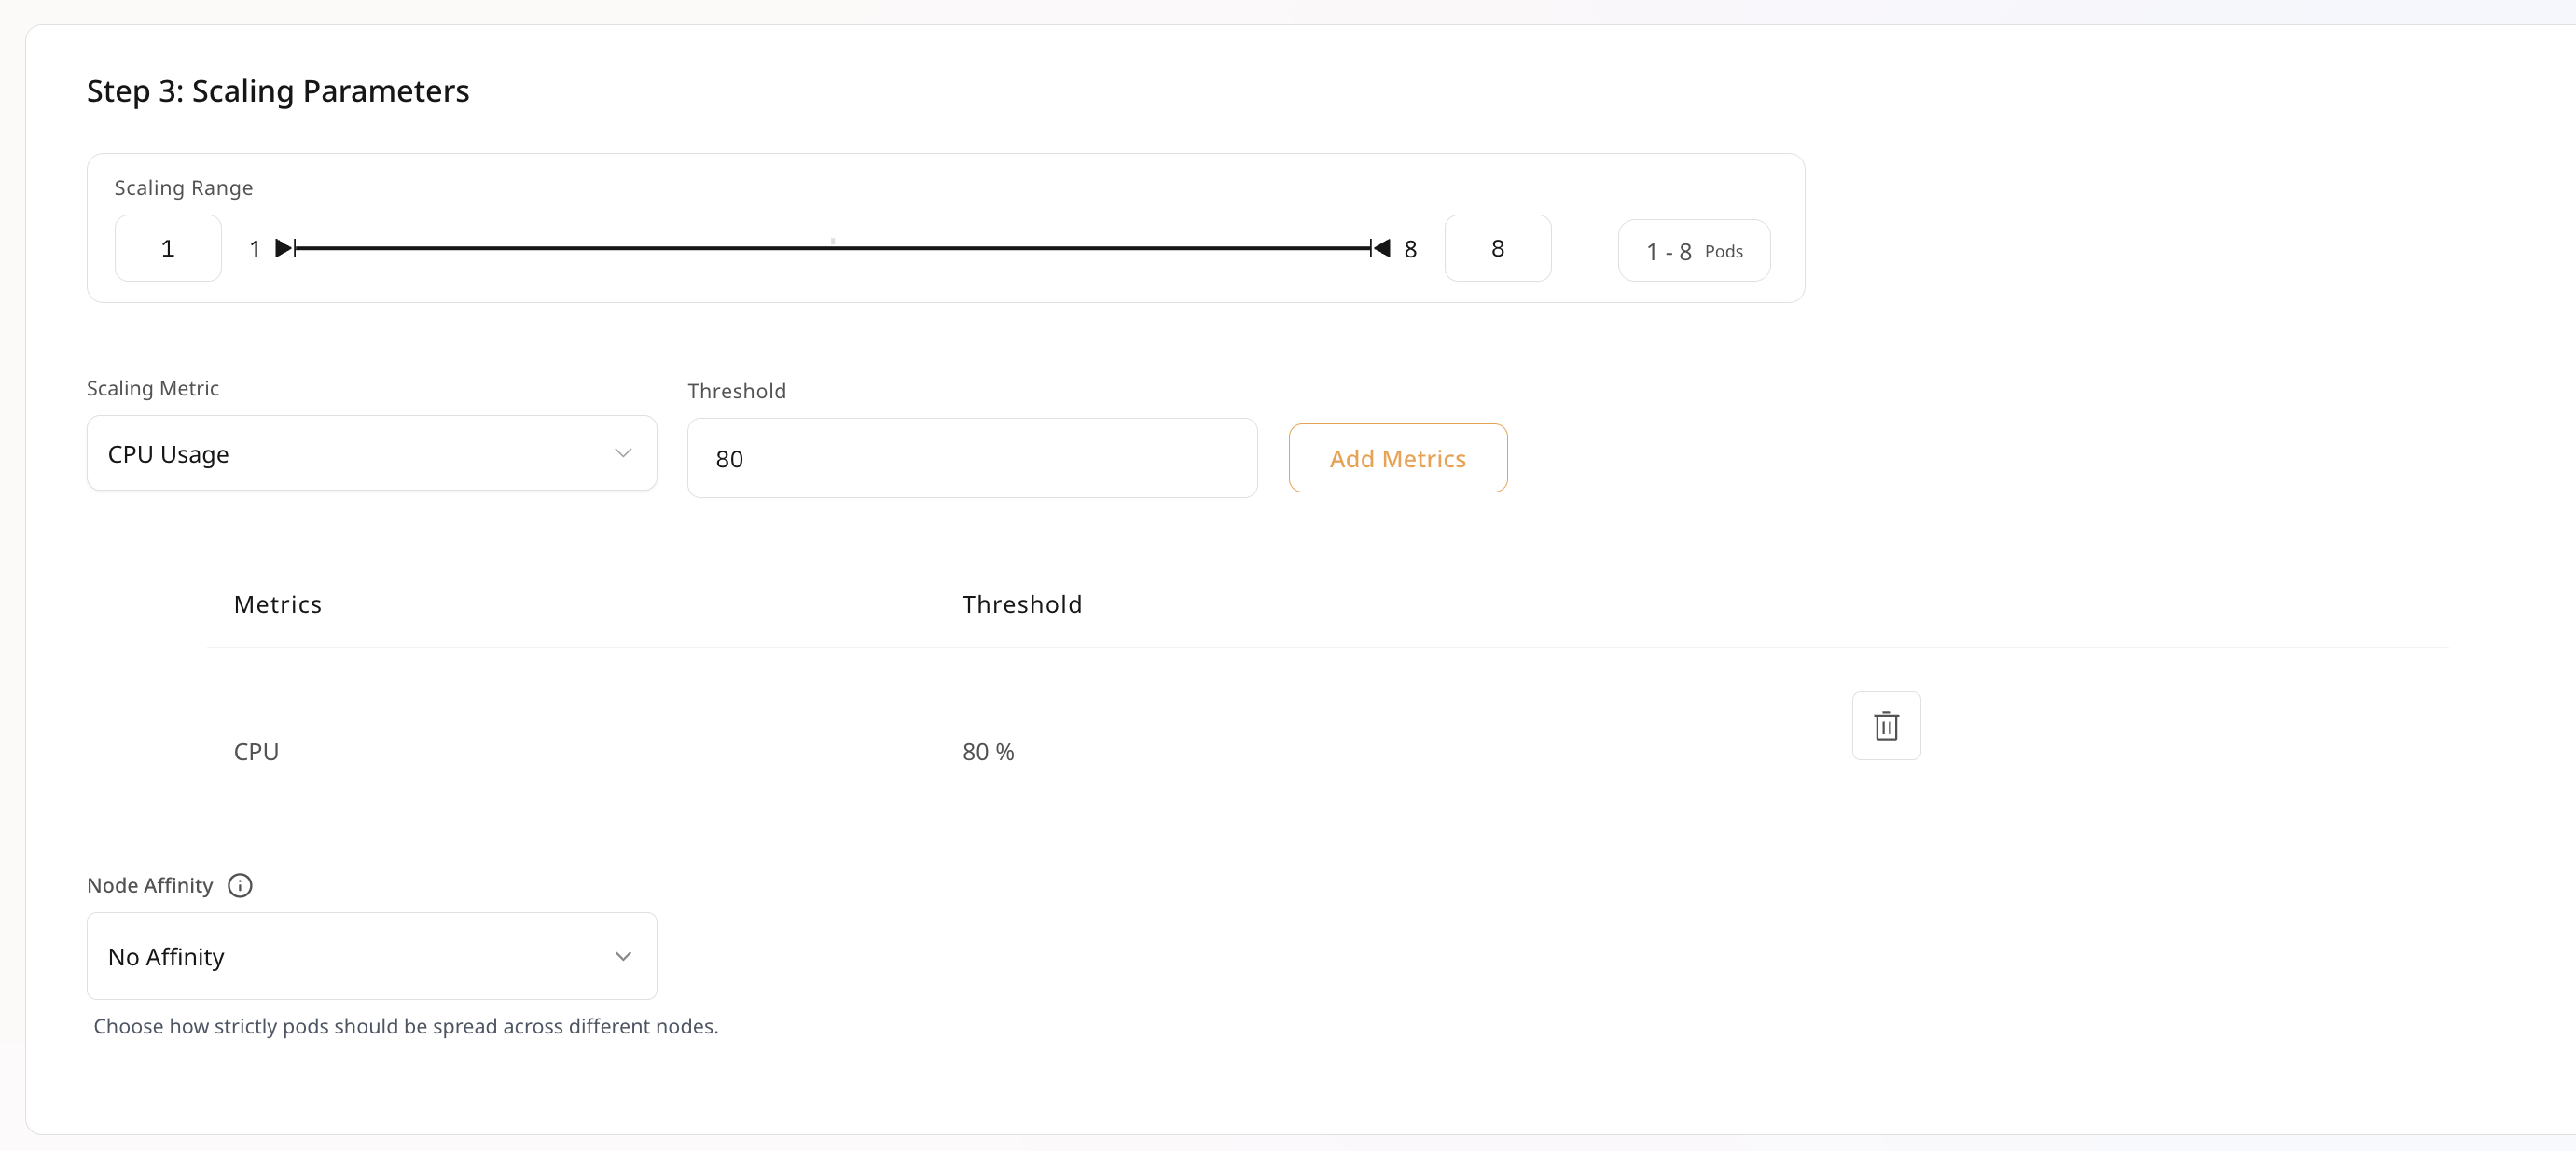
## **Adding Scaling Metrics**
* Specify the scaling metrics that will be used to auto-scale your deployment.
* Set the threshold values for each metric to trigger scaling actions.
## **Configure Infrastructure (Resource Details)**
* Choose the appropriate accelerators for your deployment, such as GPUs/CPUs.
## **Adding Scaling Metrics**
* Specify the scaling metrics that will be used to auto-scale your deployment.
* Set the threshold values for each metric to trigger scaling actions.
 ## **Deploy**
* Click on the **Deploy Model** button to initiate the deployment process.
* Check the right part of the screen to see the creation status of your deployment.
* Monitor the deployment status to know when the model is ready for usage.
* The status will show `deployed` once done. Your model is now ready for use.
## SSH Access
SSH access lets you connect directly to a running container in your deployment, which is useful for debugging, inspecting logs, or running ad-hoc commands without rebuilding and redeploying.
## **Deploy**
* Click on the **Deploy Model** button to initiate the deployment process.
* Check the right part of the screen to see the creation status of your deployment.
* Monitor the deployment status to know when the model is ready for usage.
* The status will show `deployed` once done. Your model is now ready for use.
## SSH Access
SSH access lets you connect directly to a running container in your deployment, which is useful for debugging, inspecting logs, or running ad-hoc commands without rebuilding and redeploying.
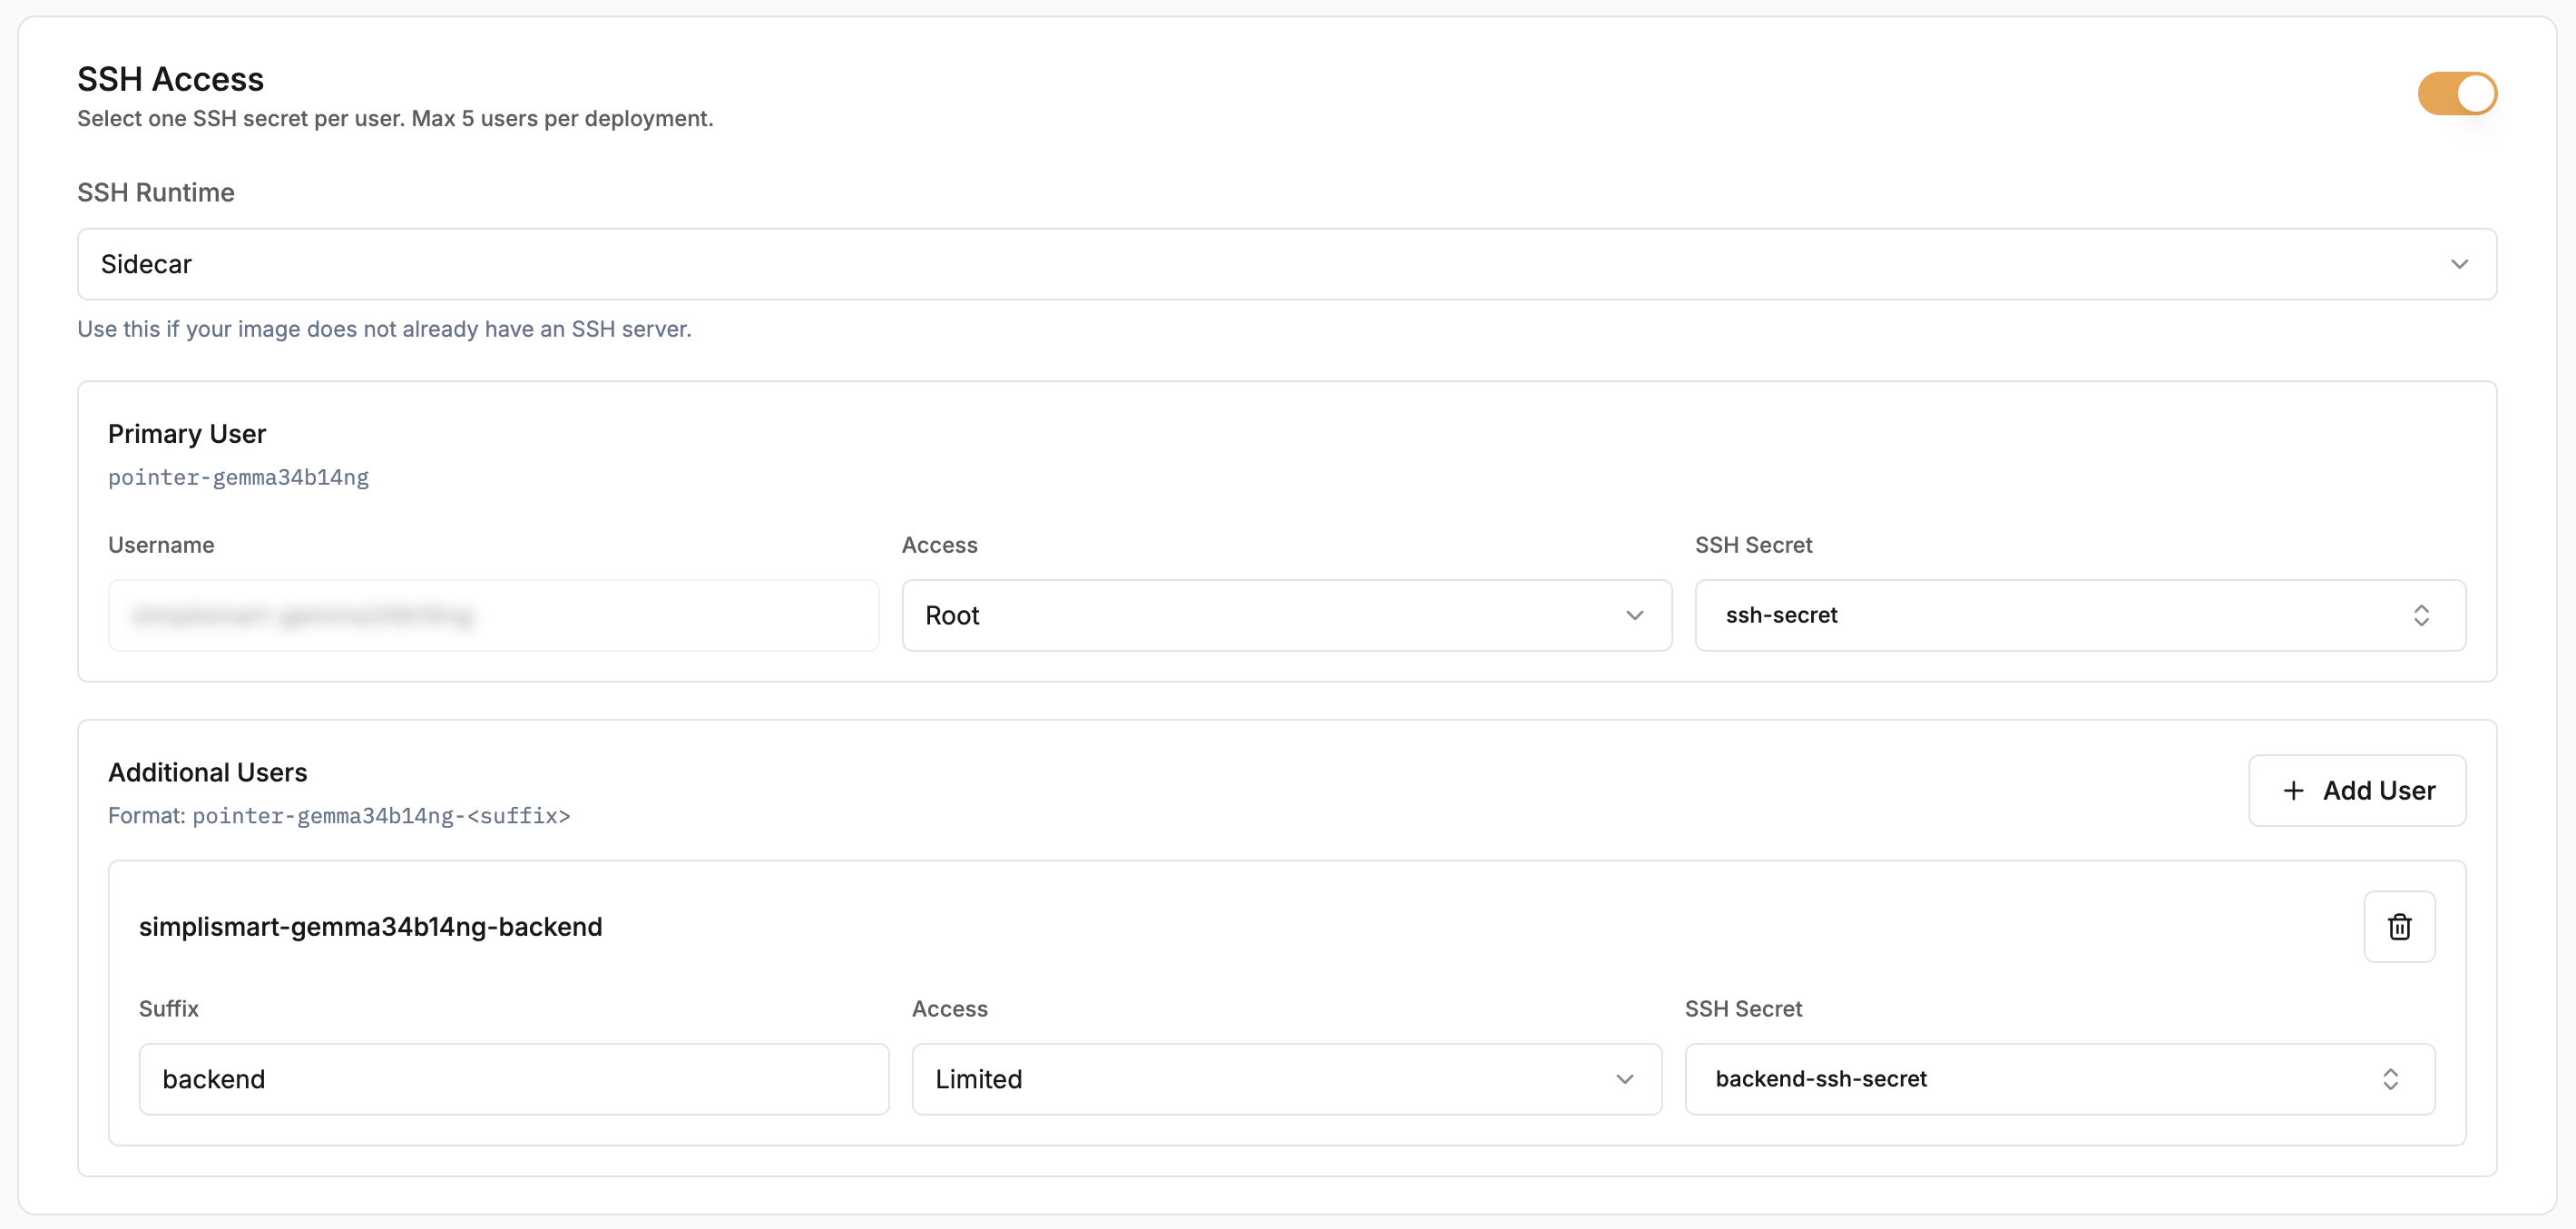 Toggle **SSH Access** on during deployment creation to configure it. Up to 5 users per deployment are supported.
### SSH Runtime
The **SSH Runtime** dropdown controls how SSH is served:
* **Sidecar**: Shakti Studio injects a sidecar container that handles SSH. Use this if your image does not already include an SSH server. No changes to your Dockerfile are required.
* **Main Container**: SSH runs inside your primary container. Use this when you are bringing your own image that already has `openssh-server` installed and configured.
### Users
**Primary User** is created automatically. The username is derived from your deployment slug (e.g. `-`) and gets **Root** access by default.
**Additional Users** follow the format `--` and are granted **Limited** access. You can add up to 4 additional users alongside the primary user.
Each user is associated with an **SSH Secret**, a Kubernetes secret holding the authorized public key for that user.
### Bringing Your Own Image with SSH
If you select **Main Container** as the runtime, your image must have `openssh-server` installed and `sshd` configured to start on launch. Below is a reference Dockerfile:
```dockerfile theme={null}
FROM nvidia/cuda:13.0.0-runtime-ubuntu24.04
RUN apt-get update && \
apt-get install -y --no-install-recommends \
bash \
openssh-server \
openssh-client \
libnss-wrapper && \
rm -rf /var/lib/apt/lists/*
COPY entrypoint.sh /usr/local/bin/entrypoint.sh
RUN chmod +x /usr/local/bin/entrypoint.sh
RUN set -eux; \
if ! getent group 1000 >/dev/null; then groupadd -g 1000 appuser; fi; \
if ! id -u 1000 >/dev/null 2>&1; then useradd -u 1000 -g 1000 -s /bin/bash -M appuser; fi
EXPOSE 2222
USER 1000:1000
ENTRYPOINT ["/usr/local/bin/entrypoint.sh"]
```
If your environment requires CUDA 12.x, replace the base image in the Dockerfile above with:
```dockerfile theme={null}
FROM nvidia/cuda:12.9.1-runtime-ubuntu24.04
```
The rest of the Dockerfile remains unchanged.
Create an `entrypoint.sh` file in the same directory as your Dockerfile. This script initializes the SSH environment and starts the SSH daemon:
```bash entrypoint.sh theme={null}
#!/bin/bash
set -euo pipefail
# When not the designated ssh sidecar, skip sshd and idle as the main container.
if [ "${SSH_CONTAINER_ROLE:-}" != "sidecar" ]; then
exec /bin/sleep infinity
fi
RUNTIME="${SSH_RUNTIME_DIR:-/ssh-runtime}"
SSH_UID="${PUID:-1000}"
SSH_GID="${PGID:-1000}"
if [ ! -d "${RUNTIME}" ]; then
echo "ERROR: SSH runtime dir ${RUNTIME} is missing; ensure the ssh-runtime volume is mounted here" >&2
exit 1
fi
# SSH_USERNAMES: comma-separated list of all usernames that SSHPiper may forward.
# Each gets a passwd entry so sshd can resolve them (all map to uid/gid 1000).
IFS=',' read -ra USERS <<< "${SSH_USERNAMES:-${SSH_USERNAME:-deployment-user}}"
: > "${RUNTIME}/nss-passwd"
: > "${RUNTIME}/nss-group"
for USER in "${USERS[@]}"; do
USER="${USER// /}" # trim spaces
[ -n "${USER}" ] || continue
echo "${USER}:x:${SSH_UID}:${SSH_GID}:SSH User:${RUNTIME}/home:/bin/bash" >> "${RUNTIME}/nss-passwd"
done
echo "${USERS[0]}:x:${SSH_GID}:" >> "${RUNTIME}/nss-group"
NSS_WRAPPER_LIB=$(find /usr/lib -name "libnss_wrapper.so*" -type f 2>/dev/null | head -1)
if [ -z "${NSS_WRAPPER_LIB}" ]; then
echo "ERROR: libnss_wrapper.so not found — cannot resolve SSH username" >&2
exit 1
fi
export NSS_WRAPPER_PASSWD="${RUNTIME}/nss-passwd"
export NSS_WRAPPER_GROUP="${RUNTIME}/nss-group"
export LD_PRELOAD="${NSS_WRAPPER_LIB}"
if [ ! -f "${RUNTIME}/sshd_config" ]; then
if [ -x /ssh-init/05-ssh-init.sh ]; then
/bin/bash /ssh-init/05-ssh-init.sh
else
# main_container mode: no init container pre-runs; self-initialise.
ssh-keygen -t ed25519 -f "${RUNTIME}/ssh_host_ed25519_key" -N "" -q
ssh-keygen -t rsa -b 4096 -f "${RUNTIME}/ssh_host_rsa_key" -N "" -q
chmod 600 "${RUNTIME}/ssh_host_"*
AUTH_KEYS="${SSH_AUTHORIZED_KEYS_FILE:-${RUNTIME}/home/.ssh/authorized_keys}"
mkdir -p "$(dirname "${AUTH_KEYS}")"
[ -f "${AUTH_KEYS}" ] || touch "${AUTH_KEYS}"
chmod 600 "${AUTH_KEYS}"
if [ "${SSH_AUDIT_LOGGING:-true}" = "true" ]; then
cat > "${RUNTIME}/ssh-audit-shell" << 'AUDIT_EOF'
#!/bin/bash
SESSION_ID=$(tr -dc 'a-f0-9' < /dev/urandom 2>/dev/null | head -c8 || printf '%x' "$(date +%s)")
SRC_IP="${SSH_CLIENT%% *}"
TS="$(date -u +%Y-%m-%dT%H:%M:%SZ)"
printf '%s SSH_AUDIT connect user=%s src=%s session=%s\n' "$TS" "$USER" "$SRC_IP" "$SESSION_ID" >&2
if [ -n "${SSH_ORIGINAL_COMMAND:-}" ]; then
printf '%s SSH_AUDIT exec user=%s src=%s session=%s cmd=%s\n' "$TS" "$USER" "$SRC_IP" "$SESSION_ID" "$(printf '%q' "$SSH_ORIGINAL_COMMAND")" >&2
exec /bin/bash -c "$SSH_ORIGINAL_COMMAND"
else
exec /bin/bash -l
fi
AUDIT_EOF
chmod +x "${RUNTIME}/ssh-audit-shell"
fi
SSH_PORT_VAL="${SSH_PORT:-2222}"
cat > "${RUNTIME}/sshd_config" << EOF
Port ${SSH_PORT_VAL}
HostKey ${RUNTIME}/ssh_host_ed25519_key
HostKey ${RUNTIME}/ssh_host_rsa_key
PidFile ${RUNTIME}/sshd.pid
AuthorizedKeysFile ${AUTH_KEYS}
UsePAM no
PasswordAuthentication no
ChallengeResponseAuthentication no
KbdInteractiveAuthentication no
PermitRootLogin no
AllowTcpForwarding no
AllowAgentForwarding no
GatewayPorts no
X11Forwarding no
MaxAuthTries 3
MaxSessions 2
LoginGraceTime 30
ClientAliveInterval 120
ClientAliveCountMax 2
PermitEmptyPasswords no
PermitUserEnvironment no
PermitUserRC no
PermitTunnel no
PrintLastLog yes
EOF
if [ "${SSH_AUDIT_LOGGING:-true}" = "true" ]; then
echo "ForceCommand ${RUNTIME}/ssh-audit-shell" >> "${RUNTIME}/sshd_config"
fi
fi
fi
exec /usr/sbin/sshd -D -e -f "${RUNTIME}/sshd_config"
```
Key requirements:
* `openssh-server` must be installed, SSH will not work without it.
* Password authentication is disabled; only public key auth is accepted.
* Port `2222` must be exposed.
* `ssh-keygen -A` generates the host keys at build time.
* The `CMD` optionally runs a bootstrap script (passed via `$SSH_BOOTSTRAP_SCRIPT`) before starting `sshd` in the foreground.
The SSH Secret you configure in the Secrets tab must contain the public key that corresponds to the private key you will use when connecting.
### Generate an SSH Key Pair
Before creating your deployment, generate a key pair:
```bash theme={null}
ssh-keygen -t ed25519 -f shakti_studio_key
cp shakti_studio_key shakti_studio_key.pem
```
This produces two files:
* `shakti_studio_key.pem`: your private key. Keep this locally; never share it.
* `shakti_studio_key.pub`: your public key. Add this to Shakti Studio as an **SSH Public Key** secret under [Integrations → Secrets](/model-suite/integrations/secrets).
When configuring SSH Access in the deployment form, select that secret from the **SSH Secret** dropdown for each user.
### Connecting to a Running Deployment
Once the deployment status shows `deployed`, open the deployment detail page. The **SSH Access** section shows the ready-to-use command pre-filled with your username and host:
Toggle **SSH Access** on during deployment creation to configure it. Up to 5 users per deployment are supported.
### SSH Runtime
The **SSH Runtime** dropdown controls how SSH is served:
* **Sidecar**: Shakti Studio injects a sidecar container that handles SSH. Use this if your image does not already include an SSH server. No changes to your Dockerfile are required.
* **Main Container**: SSH runs inside your primary container. Use this when you are bringing your own image that already has `openssh-server` installed and configured.
### Users
**Primary User** is created automatically. The username is derived from your deployment slug (e.g. `-`) and gets **Root** access by default.
**Additional Users** follow the format `--` and are granted **Limited** access. You can add up to 4 additional users alongside the primary user.
Each user is associated with an **SSH Secret**, a Kubernetes secret holding the authorized public key for that user.
### Bringing Your Own Image with SSH
If you select **Main Container** as the runtime, your image must have `openssh-server` installed and `sshd` configured to start on launch. Below is a reference Dockerfile:
```dockerfile theme={null}
FROM nvidia/cuda:13.0.0-runtime-ubuntu24.04
RUN apt-get update && \
apt-get install -y --no-install-recommends \
bash \
openssh-server \
openssh-client \
libnss-wrapper && \
rm -rf /var/lib/apt/lists/*
COPY entrypoint.sh /usr/local/bin/entrypoint.sh
RUN chmod +x /usr/local/bin/entrypoint.sh
RUN set -eux; \
if ! getent group 1000 >/dev/null; then groupadd -g 1000 appuser; fi; \
if ! id -u 1000 >/dev/null 2>&1; then useradd -u 1000 -g 1000 -s /bin/bash -M appuser; fi
EXPOSE 2222
USER 1000:1000
ENTRYPOINT ["/usr/local/bin/entrypoint.sh"]
```
If your environment requires CUDA 12.x, replace the base image in the Dockerfile above with:
```dockerfile theme={null}
FROM nvidia/cuda:12.9.1-runtime-ubuntu24.04
```
The rest of the Dockerfile remains unchanged.
Create an `entrypoint.sh` file in the same directory as your Dockerfile. This script initializes the SSH environment and starts the SSH daemon:
```bash entrypoint.sh theme={null}
#!/bin/bash
set -euo pipefail
# When not the designated ssh sidecar, skip sshd and idle as the main container.
if [ "${SSH_CONTAINER_ROLE:-}" != "sidecar" ]; then
exec /bin/sleep infinity
fi
RUNTIME="${SSH_RUNTIME_DIR:-/ssh-runtime}"
SSH_UID="${PUID:-1000}"
SSH_GID="${PGID:-1000}"
if [ ! -d "${RUNTIME}" ]; then
echo "ERROR: SSH runtime dir ${RUNTIME} is missing; ensure the ssh-runtime volume is mounted here" >&2
exit 1
fi
# SSH_USERNAMES: comma-separated list of all usernames that SSHPiper may forward.
# Each gets a passwd entry so sshd can resolve them (all map to uid/gid 1000).
IFS=',' read -ra USERS <<< "${SSH_USERNAMES:-${SSH_USERNAME:-deployment-user}}"
: > "${RUNTIME}/nss-passwd"
: > "${RUNTIME}/nss-group"
for USER in "${USERS[@]}"; do
USER="${USER// /}" # trim spaces
[ -n "${USER}" ] || continue
echo "${USER}:x:${SSH_UID}:${SSH_GID}:SSH User:${RUNTIME}/home:/bin/bash" >> "${RUNTIME}/nss-passwd"
done
echo "${USERS[0]}:x:${SSH_GID}:" >> "${RUNTIME}/nss-group"
NSS_WRAPPER_LIB=$(find /usr/lib -name "libnss_wrapper.so*" -type f 2>/dev/null | head -1)
if [ -z "${NSS_WRAPPER_LIB}" ]; then
echo "ERROR: libnss_wrapper.so not found — cannot resolve SSH username" >&2
exit 1
fi
export NSS_WRAPPER_PASSWD="${RUNTIME}/nss-passwd"
export NSS_WRAPPER_GROUP="${RUNTIME}/nss-group"
export LD_PRELOAD="${NSS_WRAPPER_LIB}"
if [ ! -f "${RUNTIME}/sshd_config" ]; then
if [ -x /ssh-init/05-ssh-init.sh ]; then
/bin/bash /ssh-init/05-ssh-init.sh
else
# main_container mode: no init container pre-runs; self-initialise.
ssh-keygen -t ed25519 -f "${RUNTIME}/ssh_host_ed25519_key" -N "" -q
ssh-keygen -t rsa -b 4096 -f "${RUNTIME}/ssh_host_rsa_key" -N "" -q
chmod 600 "${RUNTIME}/ssh_host_"*
AUTH_KEYS="${SSH_AUTHORIZED_KEYS_FILE:-${RUNTIME}/home/.ssh/authorized_keys}"
mkdir -p "$(dirname "${AUTH_KEYS}")"
[ -f "${AUTH_KEYS}" ] || touch "${AUTH_KEYS}"
chmod 600 "${AUTH_KEYS}"
if [ "${SSH_AUDIT_LOGGING:-true}" = "true" ]; then
cat > "${RUNTIME}/ssh-audit-shell" << 'AUDIT_EOF'
#!/bin/bash
SESSION_ID=$(tr -dc 'a-f0-9' < /dev/urandom 2>/dev/null | head -c8 || printf '%x' "$(date +%s)")
SRC_IP="${SSH_CLIENT%% *}"
TS="$(date -u +%Y-%m-%dT%H:%M:%SZ)"
printf '%s SSH_AUDIT connect user=%s src=%s session=%s\n' "$TS" "$USER" "$SRC_IP" "$SESSION_ID" >&2
if [ -n "${SSH_ORIGINAL_COMMAND:-}" ]; then
printf '%s SSH_AUDIT exec user=%s src=%s session=%s cmd=%s\n' "$TS" "$USER" "$SRC_IP" "$SESSION_ID" "$(printf '%q' "$SSH_ORIGINAL_COMMAND")" >&2
exec /bin/bash -c "$SSH_ORIGINAL_COMMAND"
else
exec /bin/bash -l
fi
AUDIT_EOF
chmod +x "${RUNTIME}/ssh-audit-shell"
fi
SSH_PORT_VAL="${SSH_PORT:-2222}"
cat > "${RUNTIME}/sshd_config" << EOF
Port ${SSH_PORT_VAL}
HostKey ${RUNTIME}/ssh_host_ed25519_key
HostKey ${RUNTIME}/ssh_host_rsa_key
PidFile ${RUNTIME}/sshd.pid
AuthorizedKeysFile ${AUTH_KEYS}
UsePAM no
PasswordAuthentication no
ChallengeResponseAuthentication no
KbdInteractiveAuthentication no
PermitRootLogin no
AllowTcpForwarding no
AllowAgentForwarding no
GatewayPorts no
X11Forwarding no
MaxAuthTries 3
MaxSessions 2
LoginGraceTime 30
ClientAliveInterval 120
ClientAliveCountMax 2
PermitEmptyPasswords no
PermitUserEnvironment no
PermitUserRC no
PermitTunnel no
PrintLastLog yes
EOF
if [ "${SSH_AUDIT_LOGGING:-true}" = "true" ]; then
echo "ForceCommand ${RUNTIME}/ssh-audit-shell" >> "${RUNTIME}/sshd_config"
fi
fi
fi
exec /usr/sbin/sshd -D -e -f "${RUNTIME}/sshd_config"
```
Key requirements:
* `openssh-server` must be installed, SSH will not work without it.
* Password authentication is disabled; only public key auth is accepted.
* Port `2222` must be exposed.
* `ssh-keygen -A` generates the host keys at build time.
* The `CMD` optionally runs a bootstrap script (passed via `$SSH_BOOTSTRAP_SCRIPT`) before starting `sshd` in the foreground.
The SSH Secret you configure in the Secrets tab must contain the public key that corresponds to the private key you will use when connecting.
### Generate an SSH Key Pair
Before creating your deployment, generate a key pair:
```bash theme={null}
ssh-keygen -t ed25519 -f shakti_studio_key
cp shakti_studio_key shakti_studio_key.pem
```
This produces two files:
* `shakti_studio_key.pem`: your private key. Keep this locally; never share it.
* `shakti_studio_key.pub`: your public key. Add this to Shakti Studio as an **SSH Public Key** secret under [Integrations → Secrets](/model-suite/integrations/secrets).
When configuring SSH Access in the deployment form, select that secret from the **SSH Secret** dropdown for each user.
### Connecting to a Running Deployment
Once the deployment status shows `deployed`, open the deployment detail page. The **SSH Access** section shows the ready-to-use command pre-filled with your username and host:
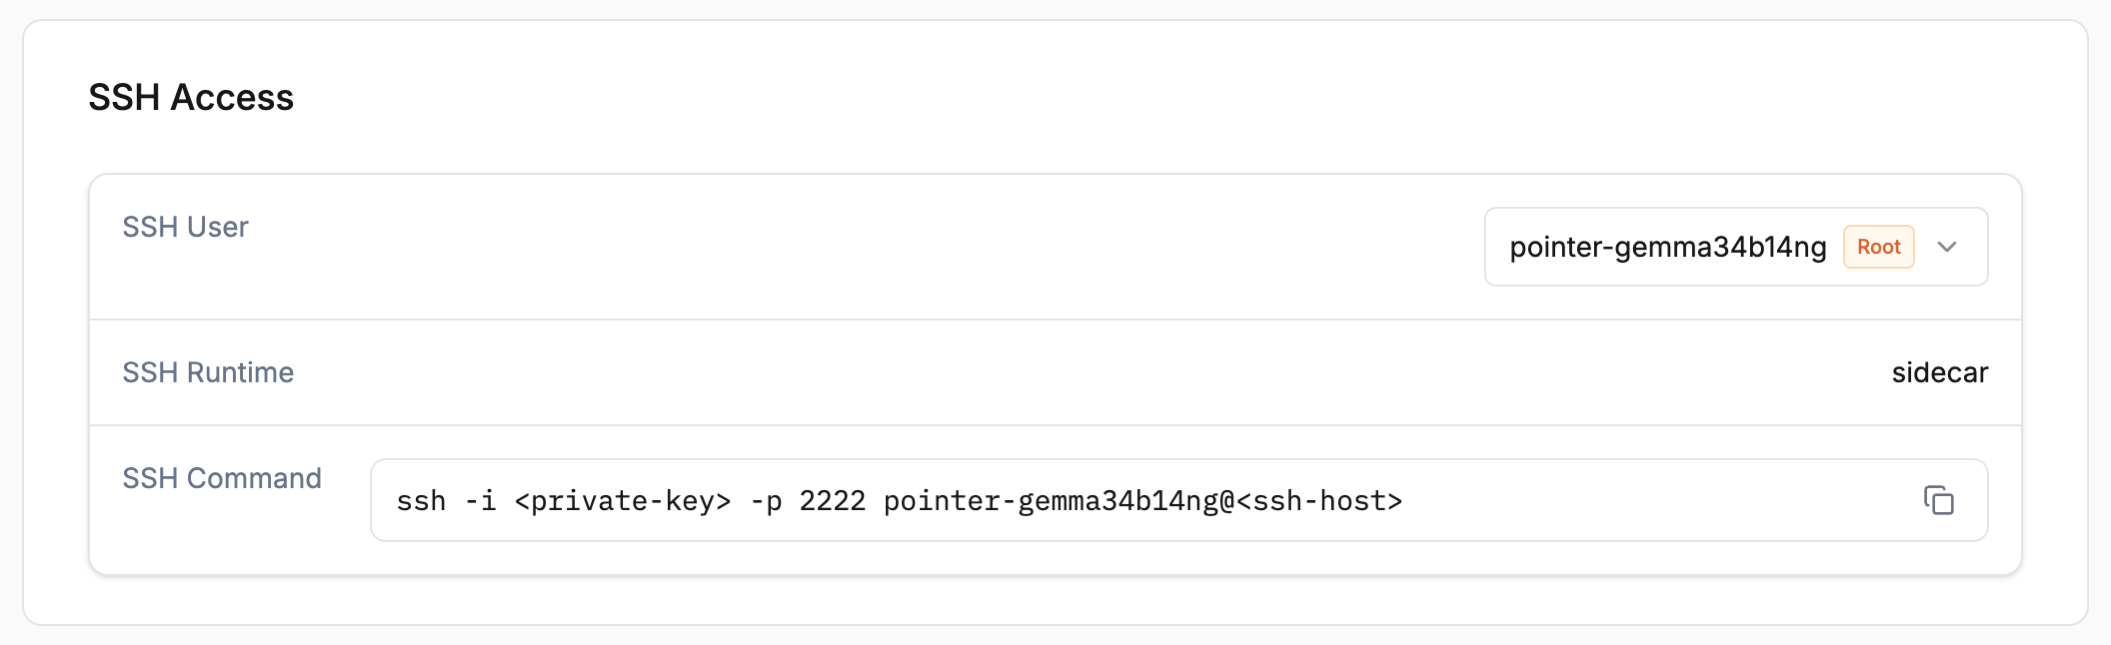 Copy the command and point `-i` to your `.pem` private key file:
```bash theme={null}
ssh -i shakti_studio_key.pem -p 2222 pointer-@
```
The panel also displays:
* **SSH User**: Auto generated primary username tied to your deployment slug
* **Access Level**: `root` for the primary user, `limited` for additional users
* **SSH Runtime**: `sidecar` or `main_container`, as configured at creation
Copy the command and point `-i` to your `.pem` private key file:
```bash theme={null}
ssh -i shakti_studio_key.pem -p 2222 pointer-@
```
The panel also displays:
* **SSH User**: Auto generated primary username tied to your deployment slug
* **Access Level**: `root` for the primary user, `limited` for additional users
* **SSH Runtime**: `sidecar` or `main_container`, as configured at creation