> ## Documentation Index
> Fetch the complete documentation index at: https://docs.shaktistudio.ai/llms.txt
> Use this file to discover all available pages before exploring further.
# Deploy Your First Model
> Step-by-step guide to deploying an AI model on Shakti Studio
This guide walks you through deploying your first AI model on Shakti Studio. You'll use **Qwen 3 14B** as the example model and create a deployment with configurable scaling, storage, and tags.
## Prerequisites
* A Shakti Studio account ([Sign up](/quickstart/signup) if you haven't already)
* Basic familiarity with the Shakti Studio UI
## Deployment Process
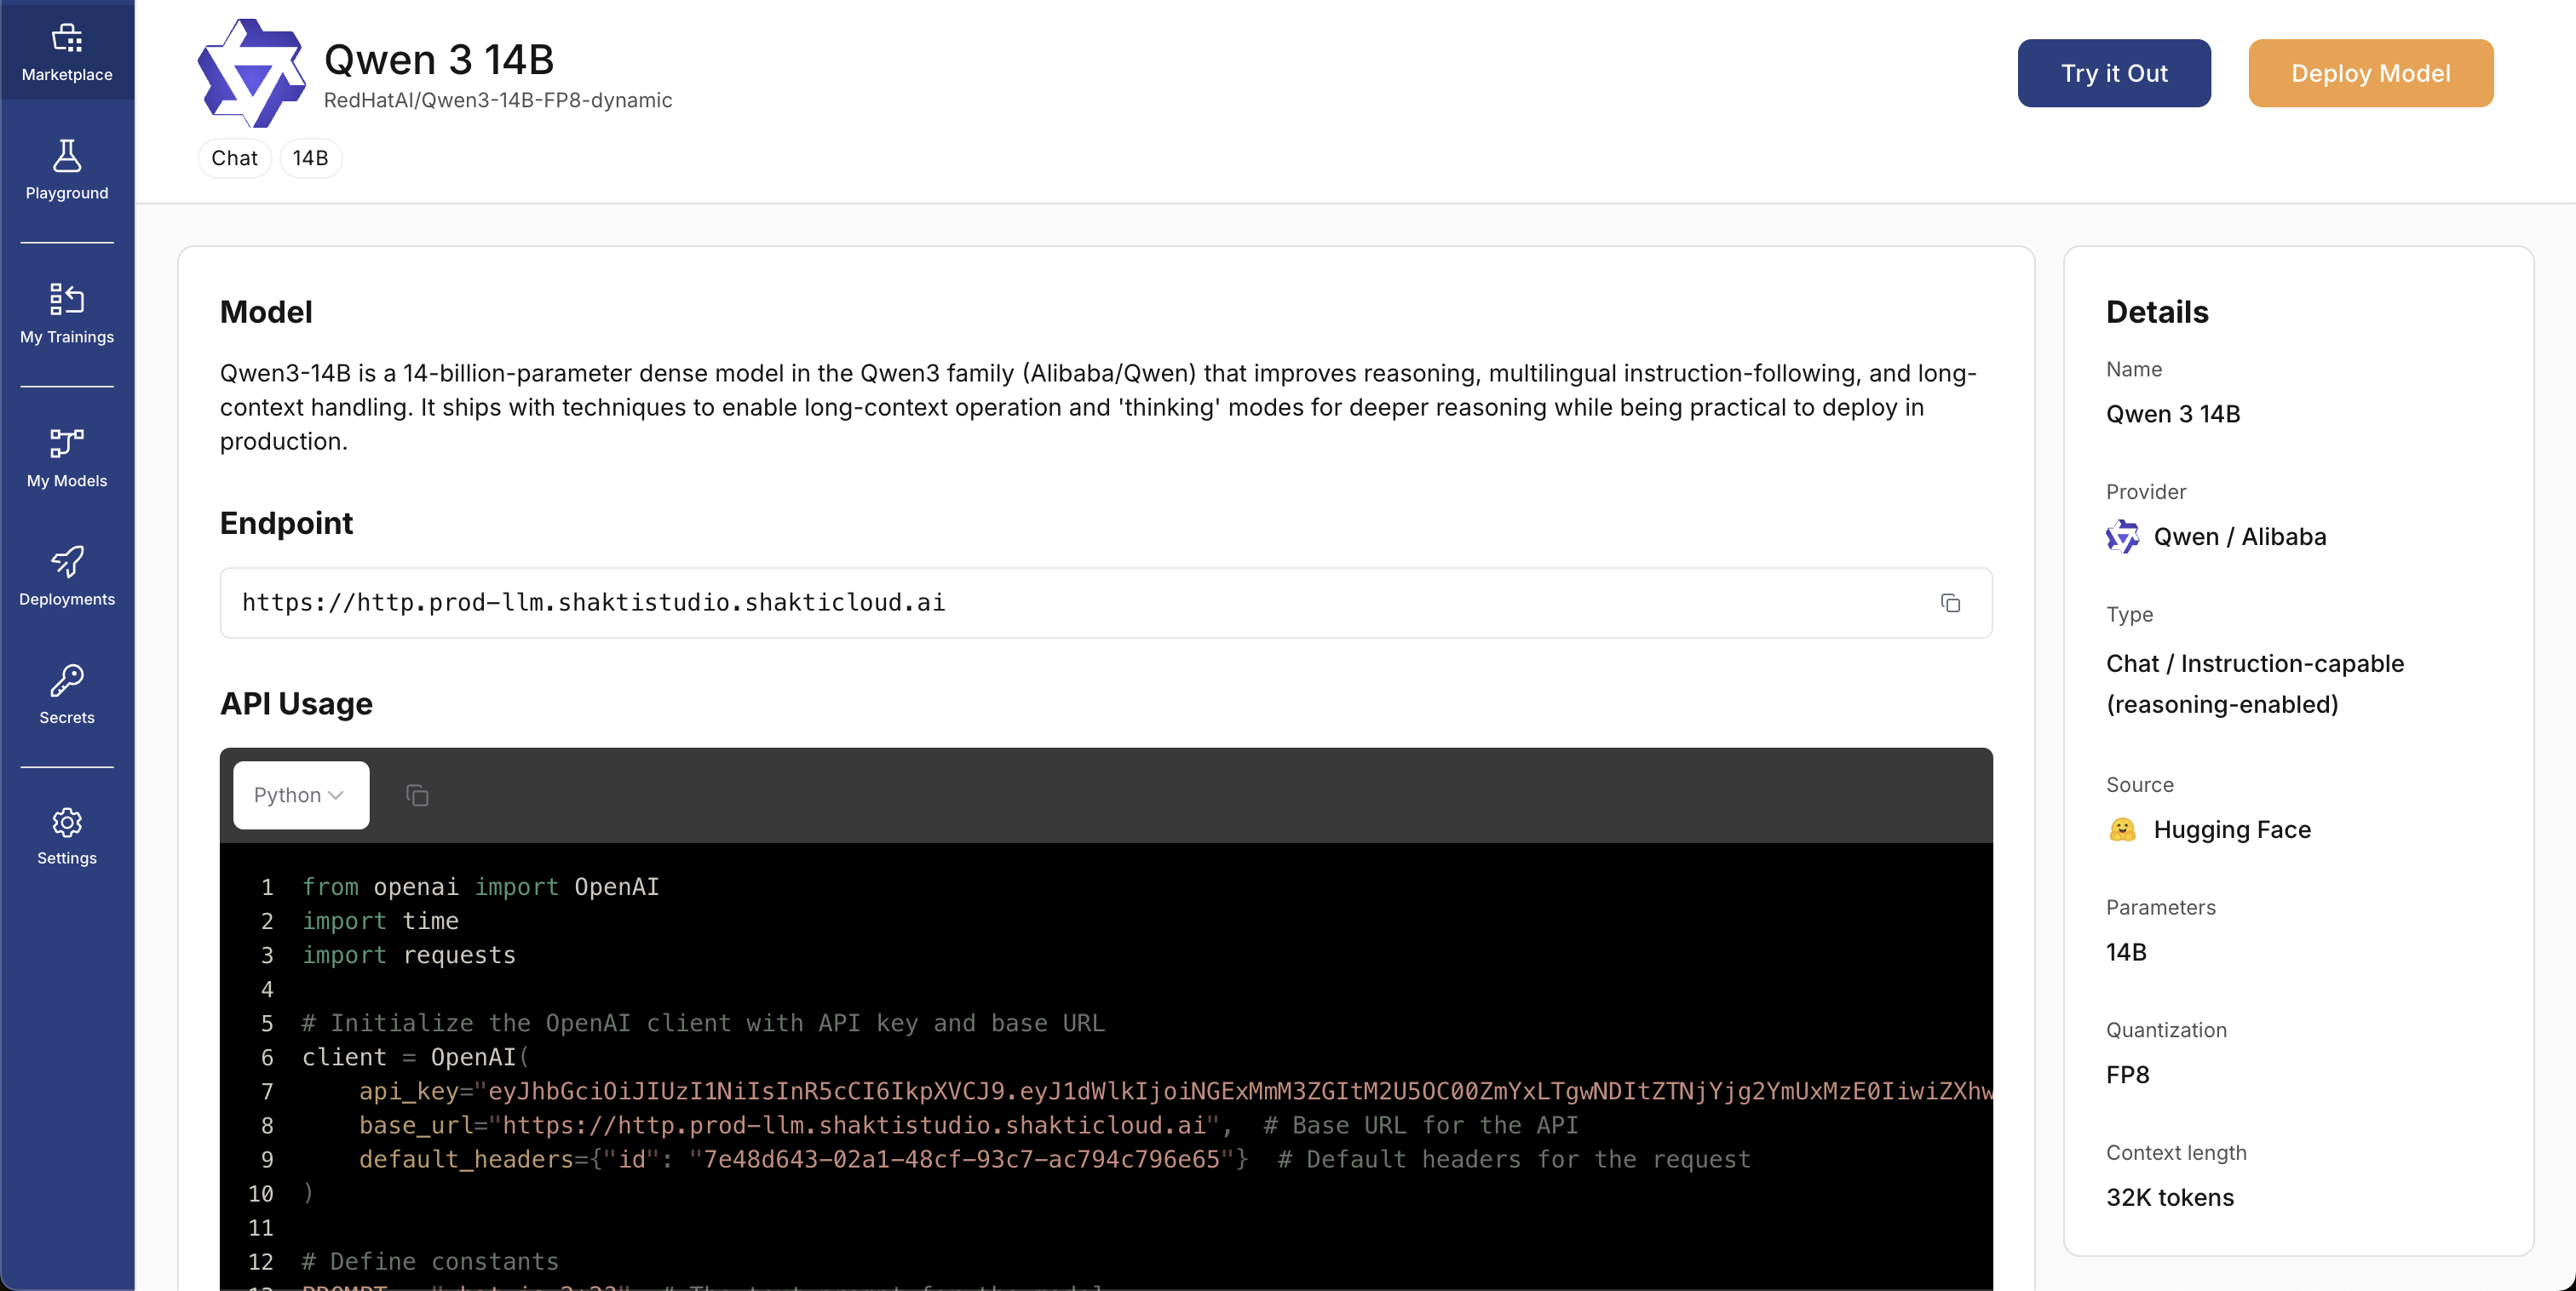 1. In the left sidebar, open **Marketplace**
2. Search for **Qwen 3 14B** in the search bar
3. Open the model card to view details
4. Click **Deploy** to start the deployment flow
1. In the left sidebar, open **Marketplace**
2. Search for **Qwen 3 14B** in the search bar
3. Open the model card to view details
4. Click **Deploy** to start the deployment flow
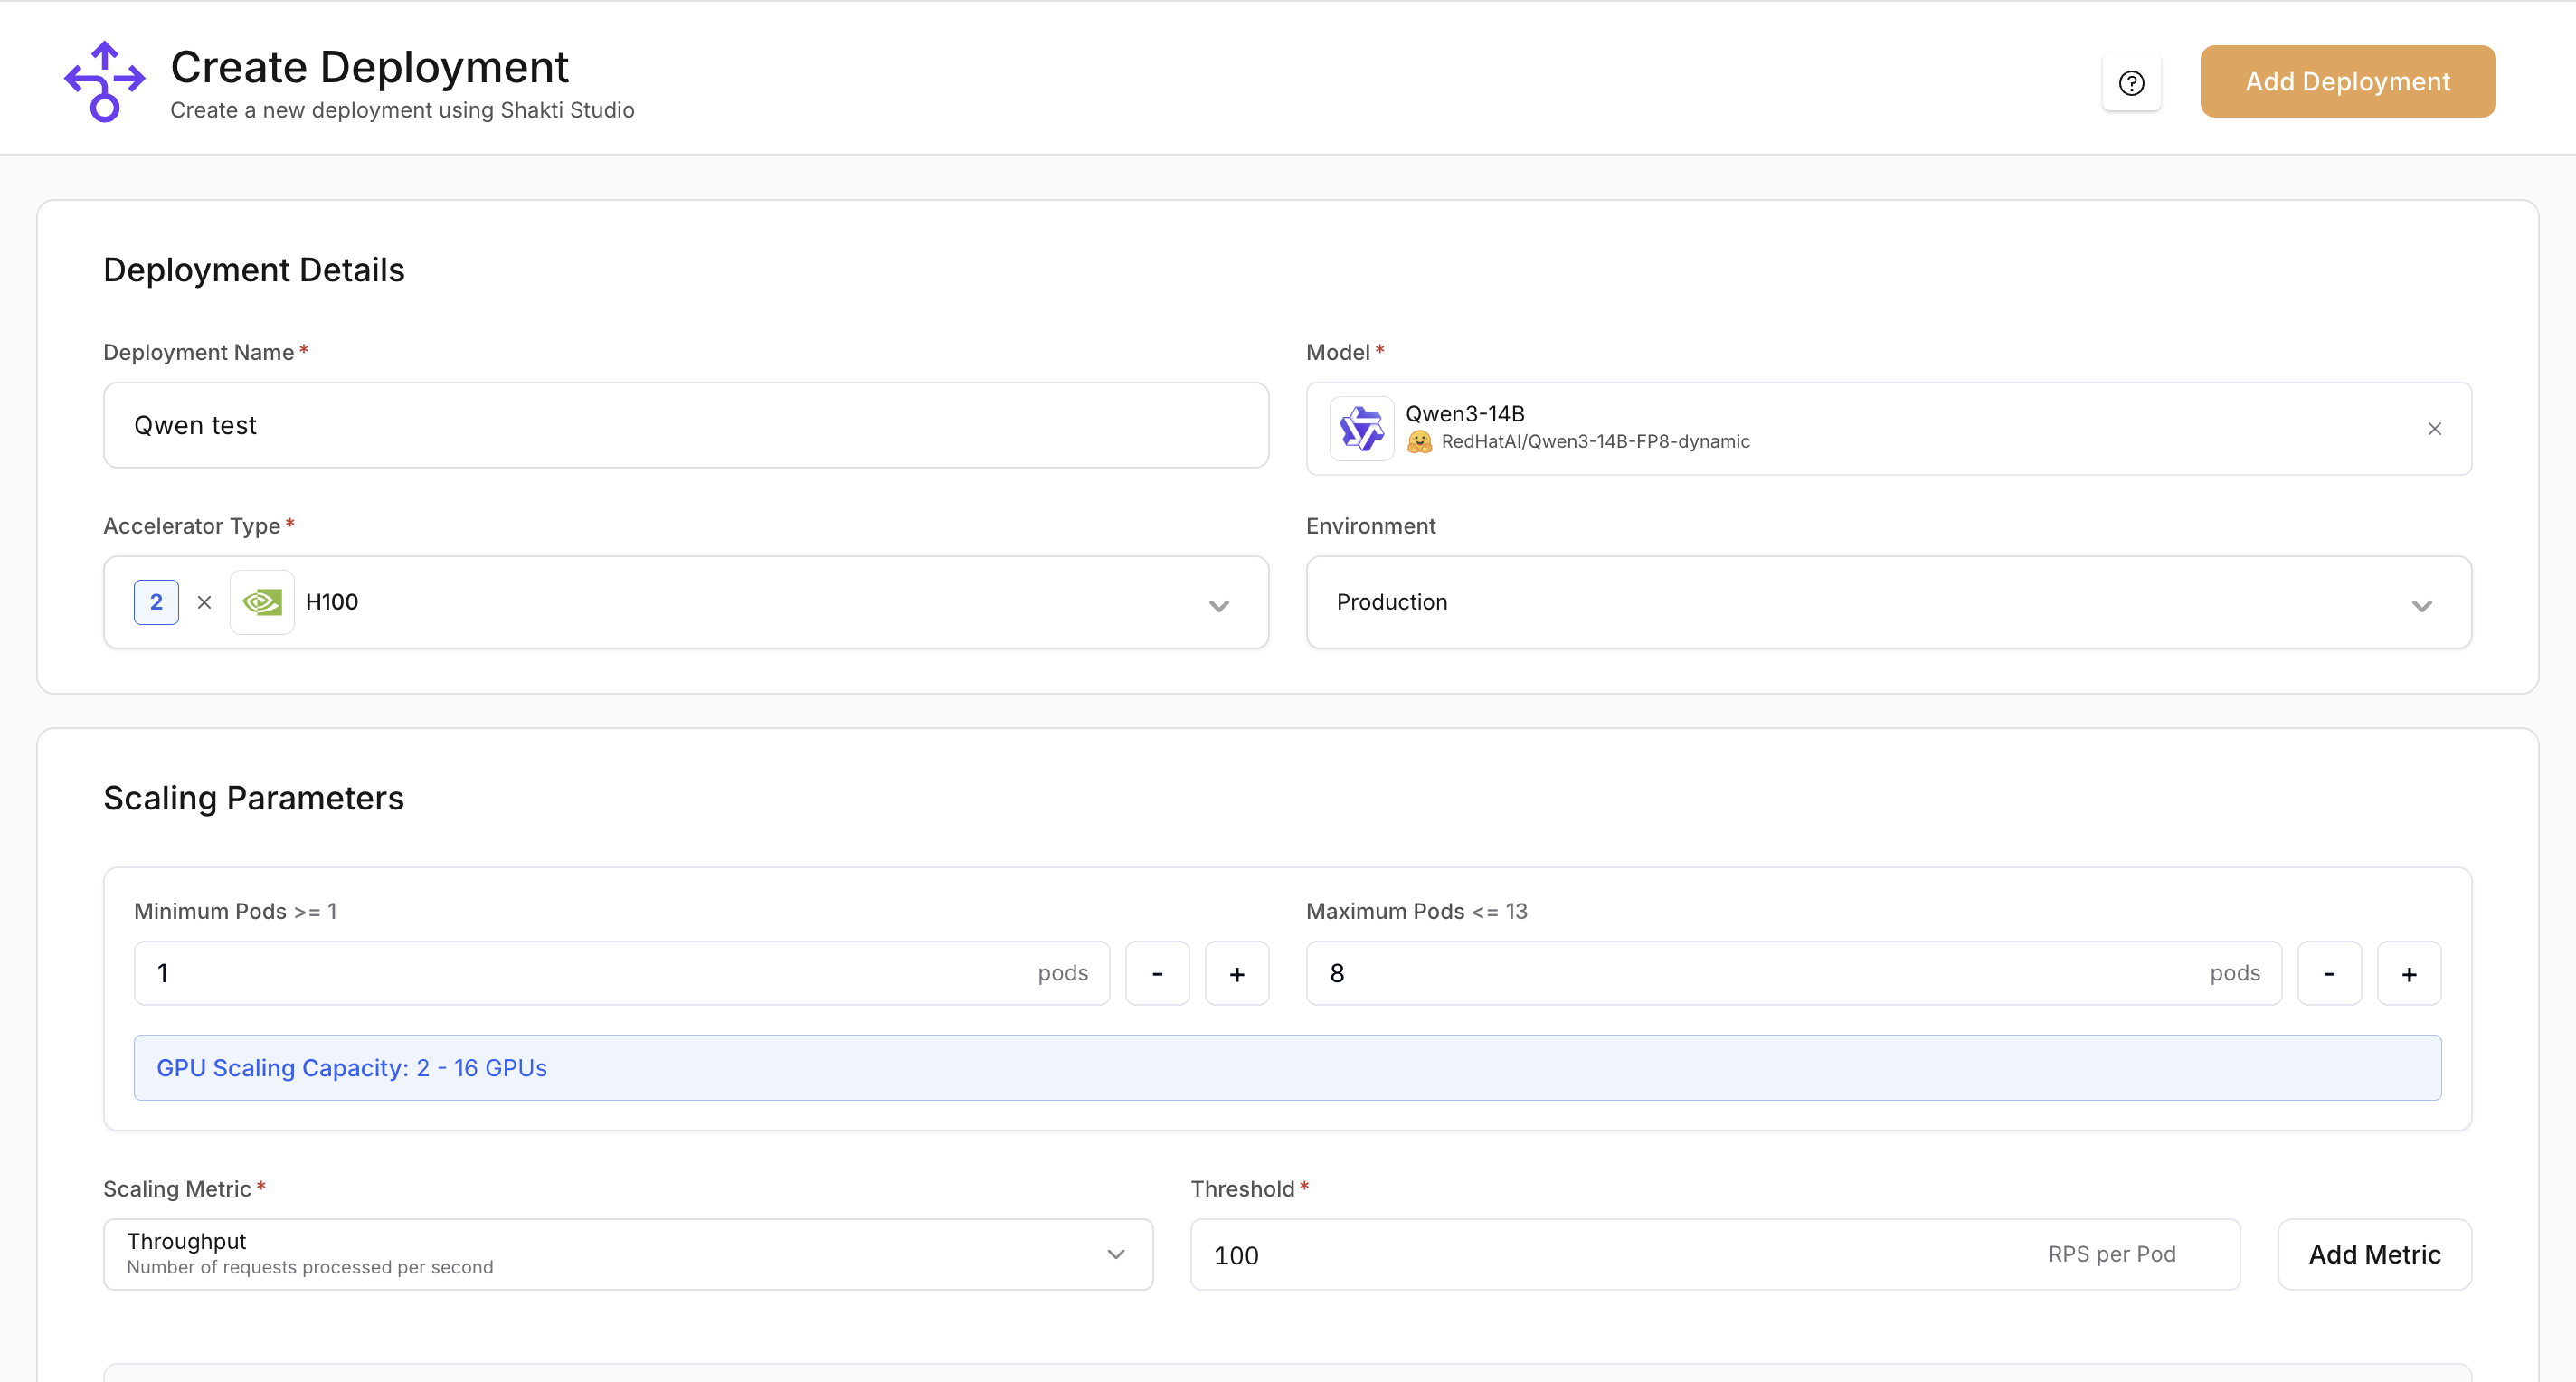 On the deployment configuration screen, complete these sections:
**Deployment details**
* **Deployment Name**: A unique, descriptive name (e.g. `qwen-3-14b-h100`)
* **Model**: Confirm **Qwen 3 14B** is selected in the dropdown
* **Accelerator type**: Choose a GPU (e.g. H100)
* **Environment**: Choose **Production** or **Testing**
**Scaling parameters**
* **Minimum Pods**: Number of replicas that stay running
* **Maximum Pods**: Upper limit for replicas when scaling up
You can set the maximum number of pods up to 16 GPUs for this deployment.
On the deployment configuration screen, complete these sections:
**Deployment details**
* **Deployment Name**: A unique, descriptive name (e.g. `qwen-3-14b-h100`)
* **Model**: Confirm **Qwen 3 14B** is selected in the dropdown
* **Accelerator type**: Choose a GPU (e.g. H100)
* **Environment**: Choose **Production** or **Testing**
**Scaling parameters**
* **Minimum Pods**: Number of replicas that stay running
* **Maximum Pods**: Upper limit for replicas when scaling up
You can set the maximum number of pods up to 16 GPUs for this deployment.
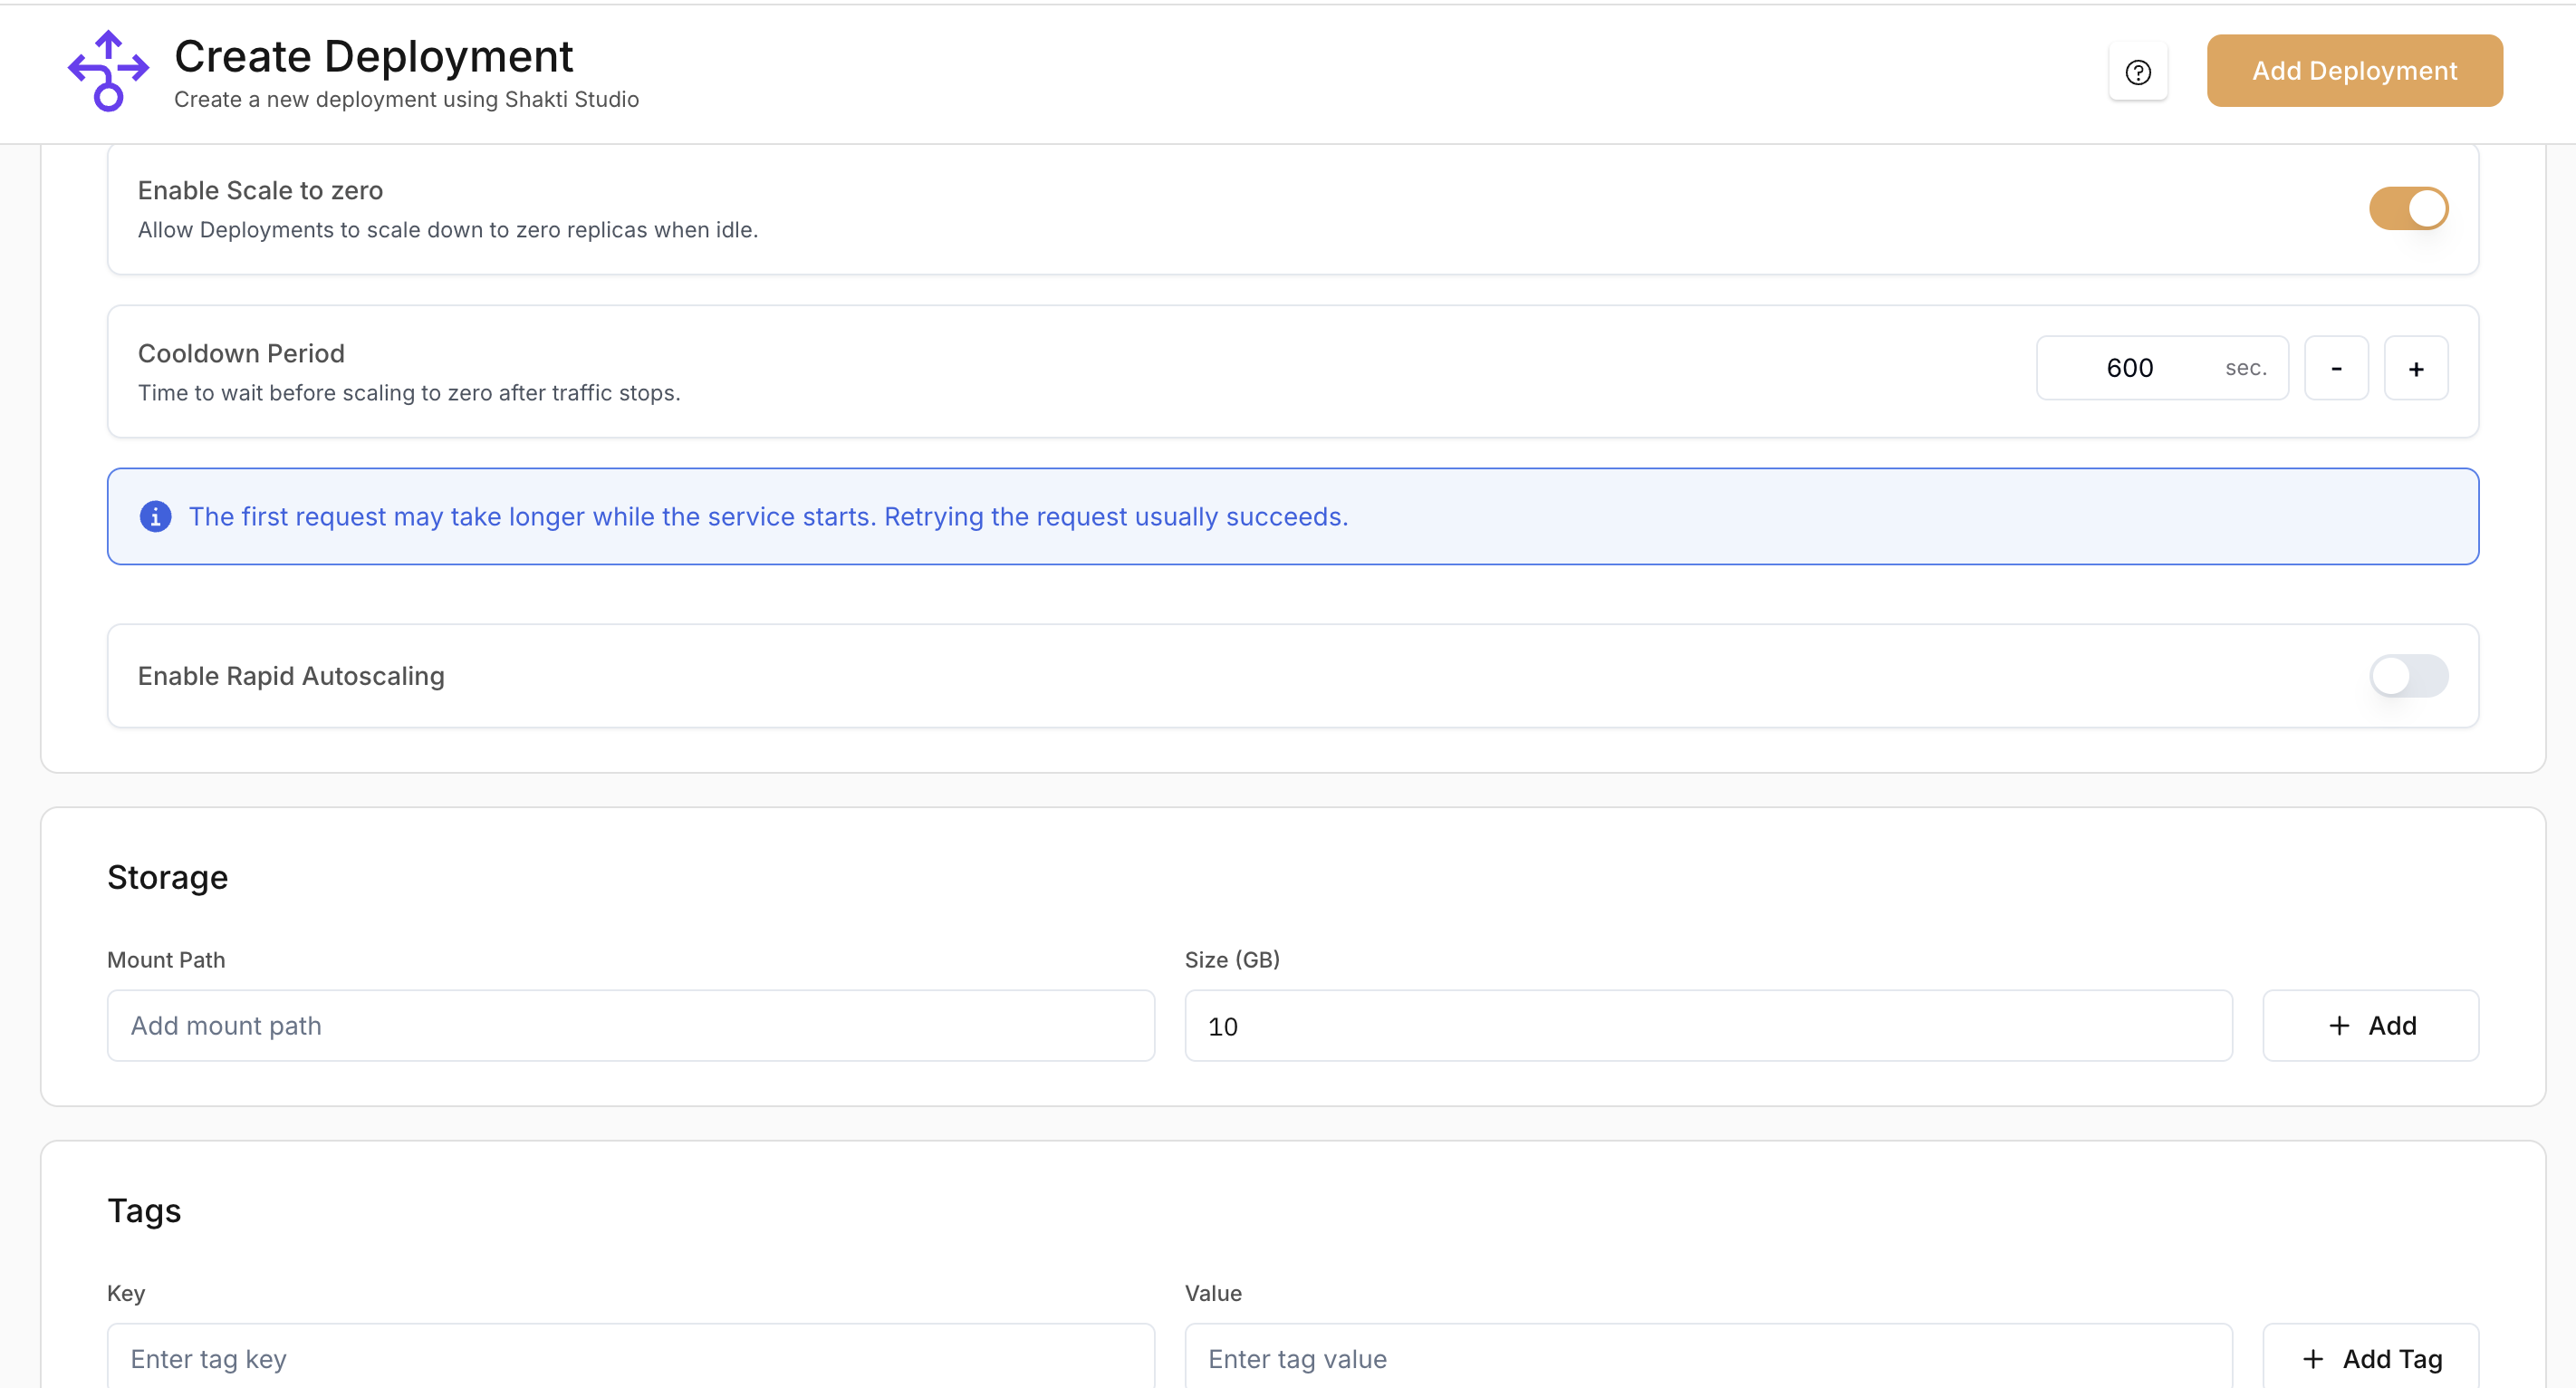 Auto-scaling adjusts replica count based on load.
1. In the **Scaling** section, confirm the default **CPU Utilization** metric (already configured).
2. Click **Add Metric** to add another metric.
3. Add **GPU Utilization** and set the target to **80%** so the deployment scales up when GPU usage reaches 80%.
For production, add custom metrics that match your workload. See [Creating a deployment](/model-suite/deployments/creating-a-deployment#scaling) for scaling options.
Configure storage only if your NIM container needs local persistent storage:
1. **Mount Path**: Enter the path where storage will be mounted in the container
2. **Size**: Specify the volume size in GB
Leave this section empty if your model does not require persistent storage.
Add key-value tags to organize and identify deployments. Use tags for:
* **Cost tracking**: attribute spend to projects or teams
* **Environment**: e.g. `env: production` or `env: staging`
* **Ownership**: team or owner
* **Category**: internal classification
Tags make it easier to filter and manage deployments as usage grows.
1. Review your configuration
2. Click **Deploy** in the top-right corner
3. In the confirmation dialog, review the deployment details
4. Click **Confirm** to start the deployment
Deployment usually finishes in 30–60 seconds. You are then redirected to the deployment details page.
For more options and detail, see the [Model Deployment Guide](/model-suite/deployments/creating-a-deployment).
Test the model via the API:
1. Open the **API** tab on the deployment details page
2. Choose **cURL** from the language dropdown
3. Copy the snippet and replace:
* `YOUR-ENDPOINT-HERE` with your endpoint URL (from the **Details** tab)
* `YOUR_API_KEY` with your API key in the `Authorization` header
4. Run the command
```bash theme={null}
curl --location 'YOUR-ENDPOINT-HERE' \
--header 'Authorization: Bearer YOUR_API_KEY' \
--header 'Content-Type: application/json' \
--data '{
"model": "YOUR-MODEL-ID-HERE",
"messages": [
{
"role": "user",
"content": [
{ "type": "text", "text": "Why is the sky blue?" }
]
}
],
"max_tokens": 1024,
"stream": false
}'
```
Replace `YOUR-ENDPOINT-HERE`, `YOUR-MODEL-ID-HERE`, and `YOUR_API_KEY` with your real values before running the command.
When you finish testing, delete the deployment to avoid ongoing charges:
1. Open **Deployments** in the left sidebar
2. Select your deployment
3. Open the three-dots menu (top-right) and choose **Delete**
4. Enter the deployment name when prompted, then confirm **Delete**
Deleting the deployment frees GPU capacity and stops billing for that deployment.
## Understanding Your Deployment
Your deployment exposes an **OpenAI-compatible** API endpoint. You can use it with any client that supports the OpenAI API. The endpoint supports:
* Text (and image inputs for multimodal models)
* Streaming and non-streaming responses
* Standard parameters such as `temperature` and `max_tokens`
## Monitoring and Management
After deployment, you can:
Track usage, latency, and throughput in the **Monitoring** tab
Scale the deployment up or down from the deployment details page
Use logs to debug and troubleshoot issues
Create and revoke API keys for secure access
## Next Steps
Now that you've successfully deployed your first model, consider these next steps:
Fine-tune the model on your data for your use case
Improve latency, throughput, and cost with our optimization guide
Auto-scaling adjusts replica count based on load.
1. In the **Scaling** section, confirm the default **CPU Utilization** metric (already configured).
2. Click **Add Metric** to add another metric.
3. Add **GPU Utilization** and set the target to **80%** so the deployment scales up when GPU usage reaches 80%.
For production, add custom metrics that match your workload. See [Creating a deployment](/model-suite/deployments/creating-a-deployment#scaling) for scaling options.
Configure storage only if your NIM container needs local persistent storage:
1. **Mount Path**: Enter the path where storage will be mounted in the container
2. **Size**: Specify the volume size in GB
Leave this section empty if your model does not require persistent storage.
Add key-value tags to organize and identify deployments. Use tags for:
* **Cost tracking**: attribute spend to projects or teams
* **Environment**: e.g. `env: production` or `env: staging`
* **Ownership**: team or owner
* **Category**: internal classification
Tags make it easier to filter and manage deployments as usage grows.
1. Review your configuration
2. Click **Deploy** in the top-right corner
3. In the confirmation dialog, review the deployment details
4. Click **Confirm** to start the deployment
Deployment usually finishes in 30–60 seconds. You are then redirected to the deployment details page.
For more options and detail, see the [Model Deployment Guide](/model-suite/deployments/creating-a-deployment).
Test the model via the API:
1. Open the **API** tab on the deployment details page
2. Choose **cURL** from the language dropdown
3. Copy the snippet and replace:
* `YOUR-ENDPOINT-HERE` with your endpoint URL (from the **Details** tab)
* `YOUR_API_KEY` with your API key in the `Authorization` header
4. Run the command
```bash theme={null}
curl --location 'YOUR-ENDPOINT-HERE' \
--header 'Authorization: Bearer YOUR_API_KEY' \
--header 'Content-Type: application/json' \
--data '{
"model": "YOUR-MODEL-ID-HERE",
"messages": [
{
"role": "user",
"content": [
{ "type": "text", "text": "Why is the sky blue?" }
]
}
],
"max_tokens": 1024,
"stream": false
}'
```
Replace `YOUR-ENDPOINT-HERE`, `YOUR-MODEL-ID-HERE`, and `YOUR_API_KEY` with your real values before running the command.
When you finish testing, delete the deployment to avoid ongoing charges:
1. Open **Deployments** in the left sidebar
2. Select your deployment
3. Open the three-dots menu (top-right) and choose **Delete**
4. Enter the deployment name when prompted, then confirm **Delete**
Deleting the deployment frees GPU capacity and stops billing for that deployment.
## Understanding Your Deployment
Your deployment exposes an **OpenAI-compatible** API endpoint. You can use it with any client that supports the OpenAI API. The endpoint supports:
* Text (and image inputs for multimodal models)
* Streaming and non-streaming responses
* Standard parameters such as `temperature` and `max_tokens`
## Monitoring and Management
After deployment, you can:
Track usage, latency, and throughput in the **Monitoring** tab
Scale the deployment up or down from the deployment details page
Use logs to debug and troubleshoot issues
Create and revoke API keys for secure access
## Next Steps
Now that you've successfully deployed your first model, consider these next steps:
Fine-tune the model on your data for your use case
Improve latency, throughput, and cost with our optimization guide