> ## Documentation Index
> Fetch the complete documentation index at: https://docs.shaktistudio.ai/llms.txt
> Use this file to discover all available pages before exploring further.
# Inference
This guide will walk you through making your first API call to Shakti Studio's pre-deployed models. Before starting, ensure you have [signed up](/signup) for a Shakti Studio account.
## Prerequisites
* A Shakti Studio account
* Basic Python knowledge
* Python 3.8+ installed on your system
## Step-by-Step Guide
1. Log in to your Shakti Studio account
2. From the left sidebar, click on **Playground**
3. In the model dropdown, select **Gemma 3 1B**. (For example purposes, Gemma 3 1B is considered here. Any other LLM can be used as well.)
4. You'll see an interactive chat interface where you can test the model directly
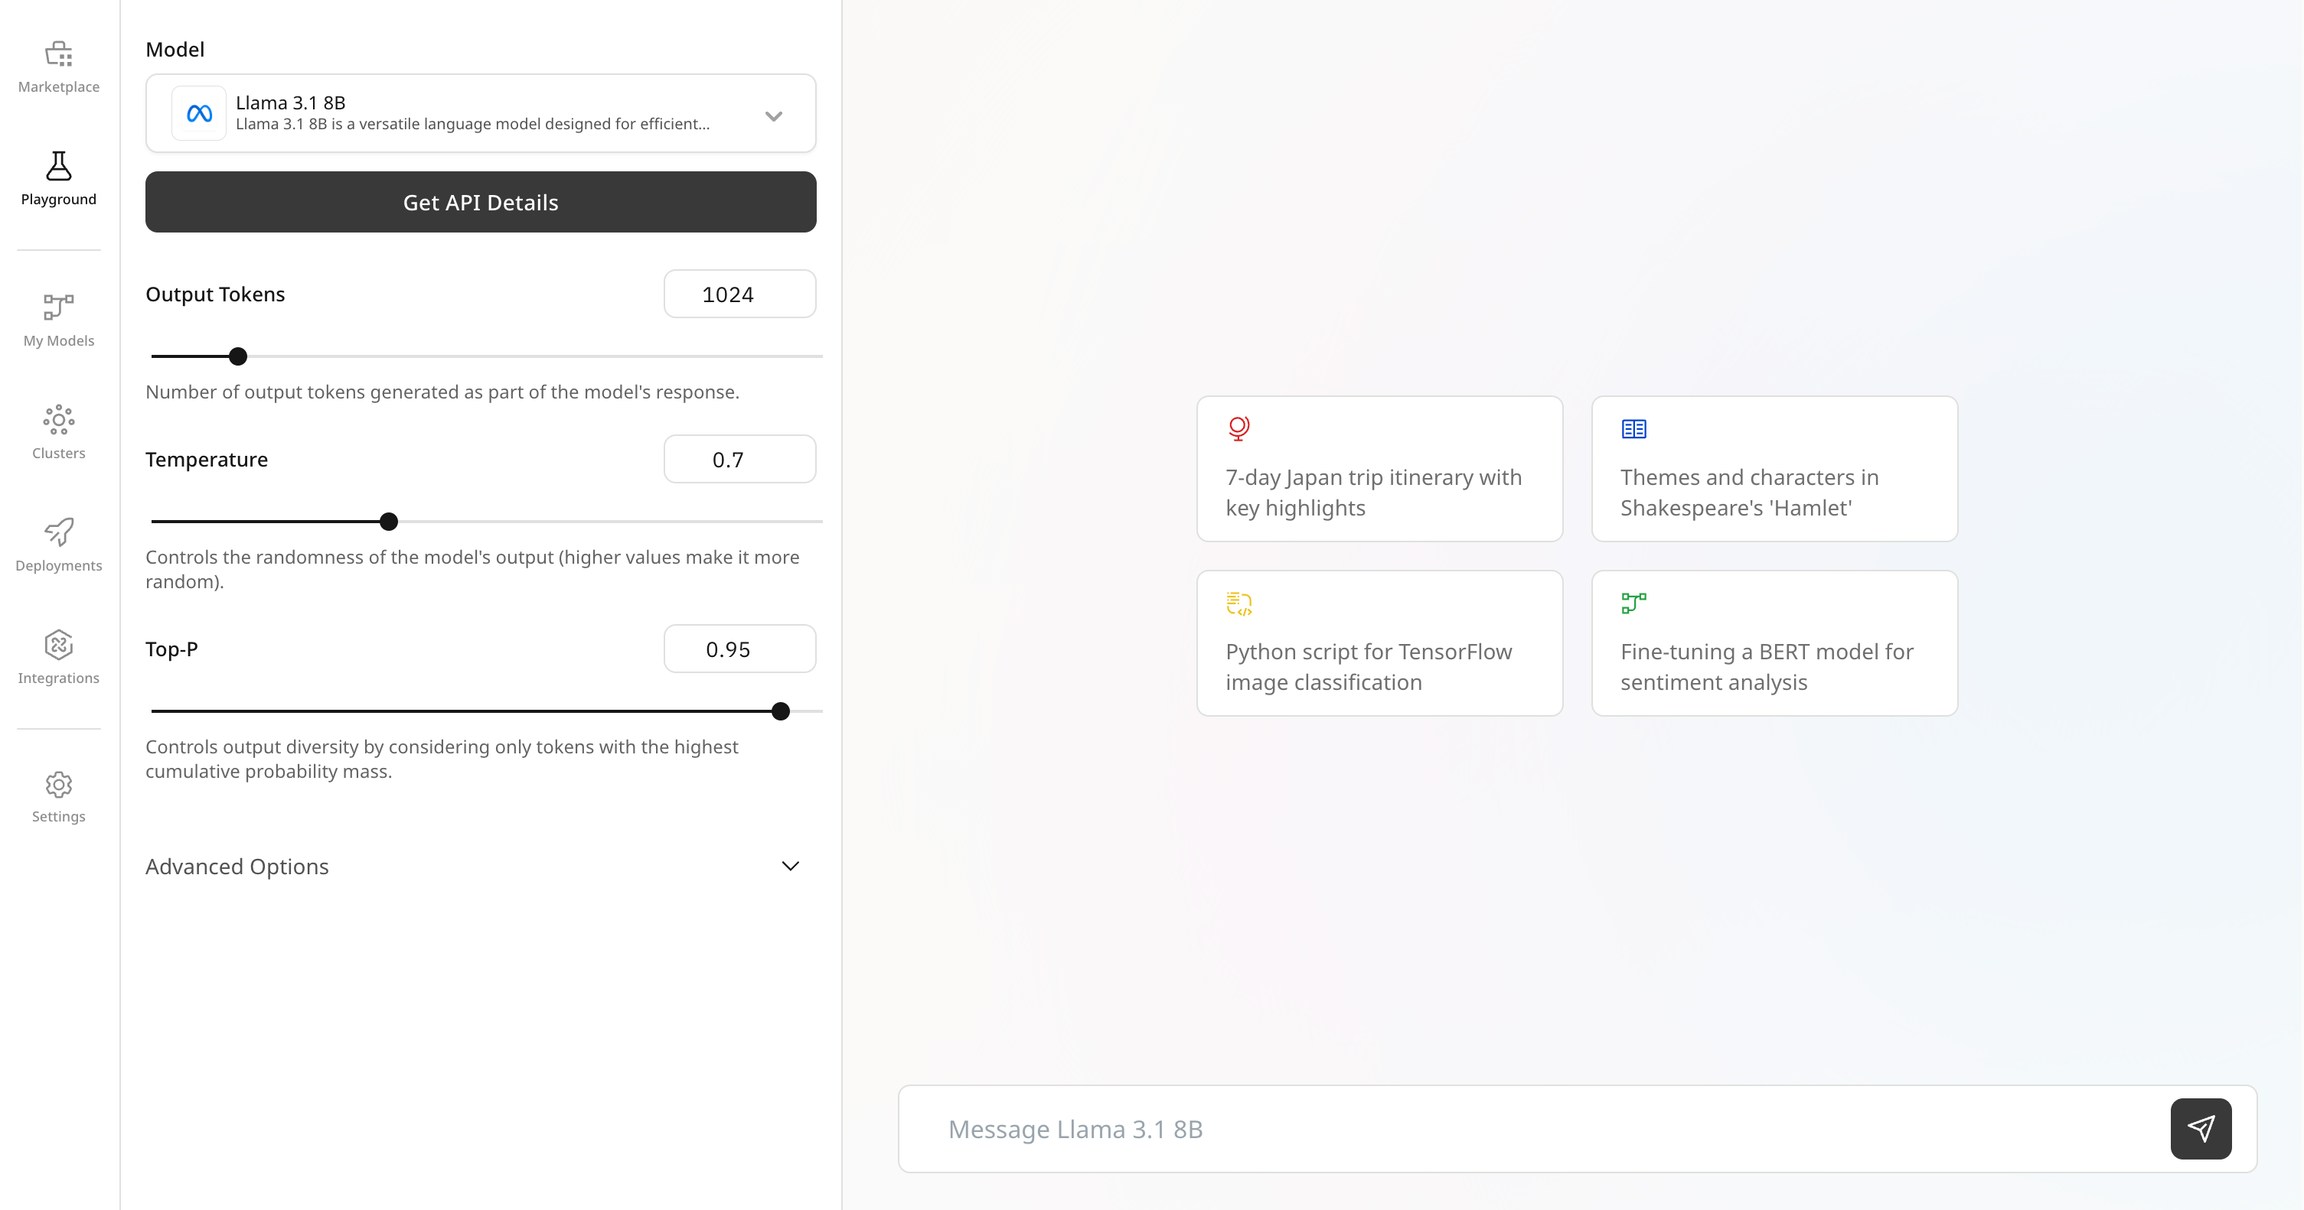 1. In the Playground, click on **Get API details** in the left sidebar
2. You'll be redirected to a page with ready-to-use code snippets
3. Note that both Python (OpenAI client) and cURL examples are provided
4. Copy the provided code snippet or use the given below
The API is compatible with any OpenAI-compliant client library, not just the official Python SDK.
Create a new file named `inference.py` with the following code:
```python theme={null}
# inference.py
from openai import OpenAI
# Replace with your actual API key from Settings > API Keys
shakti_studio_api_key = "YOUR_API_KEY"
# Replace with your endpoint for the Gemma-3-1B model from the Model details page
endpoint_url = "YOUR_MODEL_ENDPOINT"
# Request identifier, replace it with your actual ID from Playground > API details > Get API details > Select Python Code > fetch id
id = "YOUR_REQUST_ID"
try:
# Initialize the OpenAI client with Shakti Studio endpoint
client = OpenAI(
api_key=shakti_studio_api_key,
base_url=endpoint_url,
default_headers={"id": request_id}
)
# Define model and prompt
MODEL_NAME = "gemma-3"
PROMPT = "What is quantization in GenAI models?"
print(f"User: {PROMPT}\n")
print("AI Assistant: ", end="", flush=True)
# Create a streaming completion request
stream = client.chat.completions.create(
model=MODEL_NAME,
messages=[
{
"role": "system",
"content": "You are a helpful AI assistant."
},
{
"role": "user",
"content": PROMPT
}
],
max_tokens=512, # Response length limit
stream=True, # Enable streaming for faster first token
)
# Process the streamed response
for chunk in stream:
text_delta = chunk.choices[0].delta.content
if text_delta:
print(text_delta, end="", flush=True)
print() # Add newline after response
except Exception as e:
print(f"An unexpected error occurred: {e}")
```
Remember to replace `"YOUR_API_KEY"` and `YOUR_MODEL_ENDPOINT` with the actual API key and model endpoint you generated in the previous steps.
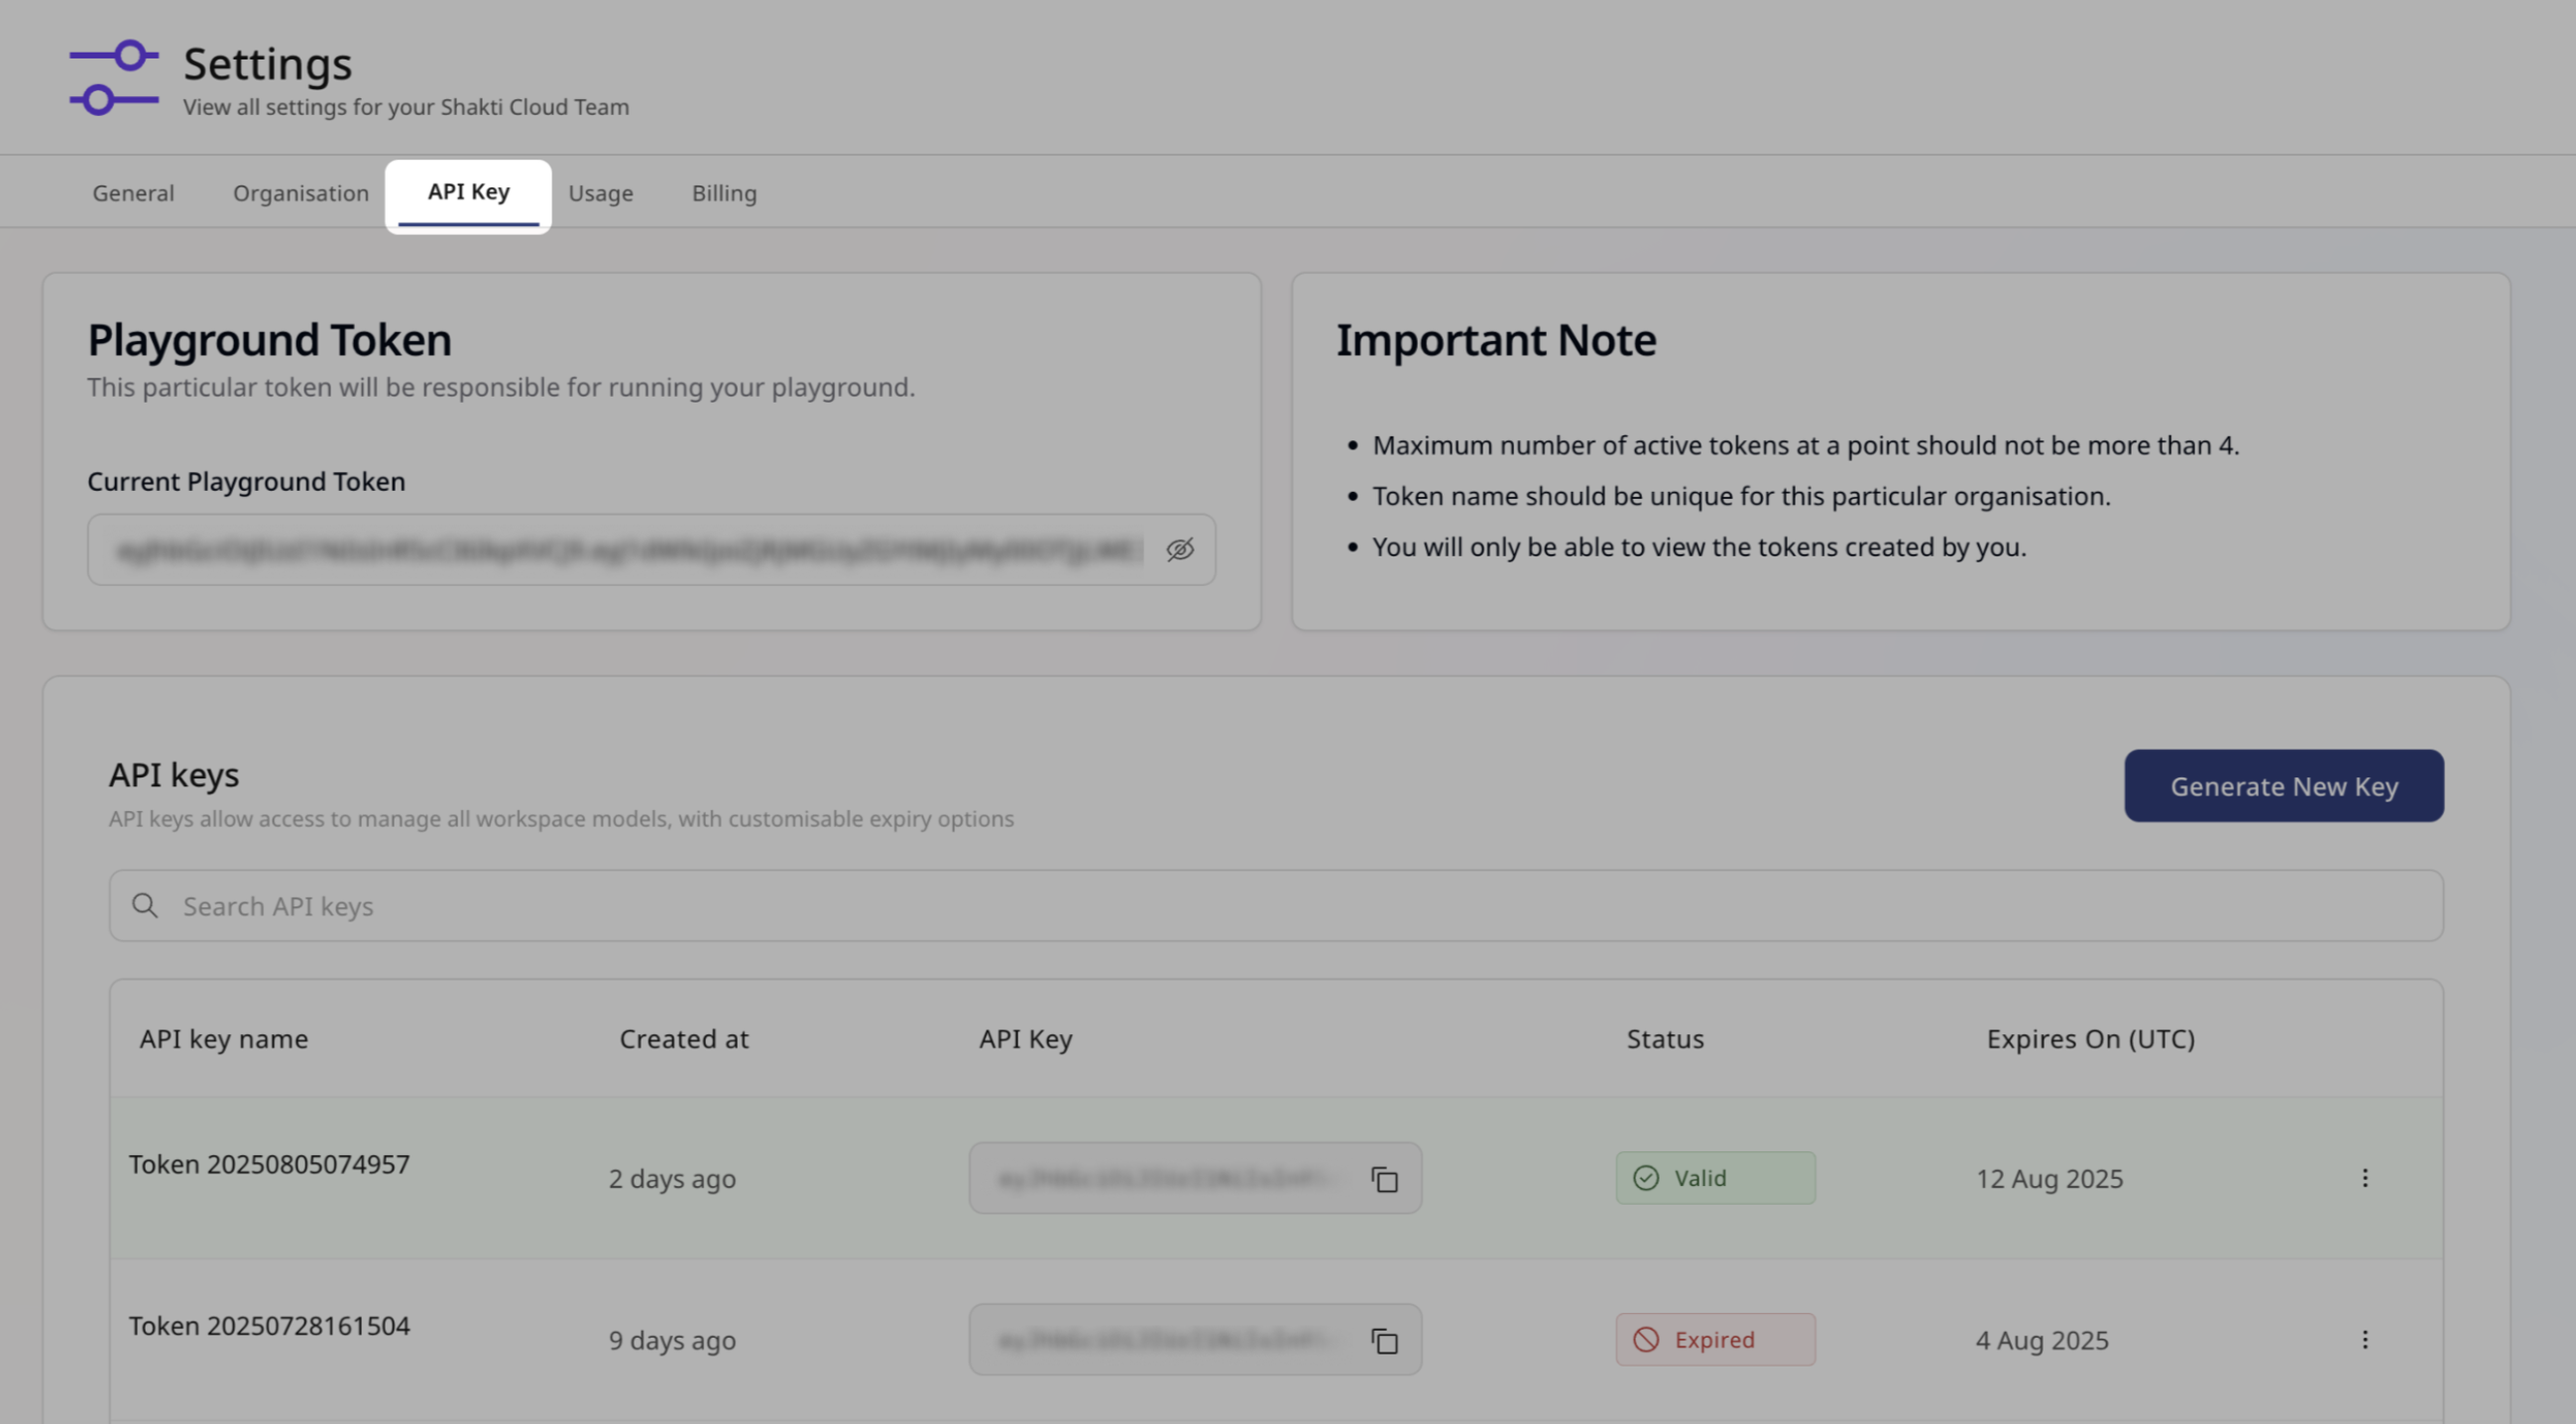
1. Navigate to **Settings > API Keys** from the main sidebar
2. Click **Generate New Key**
3. Provide a descriptive name for your key (must be unique)
4. Set an appropriate expiration date
5. Copy the generated API key (you won't be able to see it again)
1. In the Playground, click on **Get API details** in the left sidebar
2. You'll be redirected to a page with ready-to-use code snippets
3. Note that both Python (OpenAI client) and cURL examples are provided
4. Copy the provided code snippet or use the given below
The API is compatible with any OpenAI-compliant client library, not just the official Python SDK.
Create a new file named `inference.py` with the following code:
```python theme={null}
# inference.py
from openai import OpenAI
# Replace with your actual API key from Settings > API Keys
shakti_studio_api_key = "YOUR_API_KEY"
# Replace with your endpoint for the Gemma-3-1B model from the Model details page
endpoint_url = "YOUR_MODEL_ENDPOINT"
# Request identifier, replace it with your actual ID from Playground > API details > Get API details > Select Python Code > fetch id
id = "YOUR_REQUST_ID"
try:
# Initialize the OpenAI client with Shakti Studio endpoint
client = OpenAI(
api_key=shakti_studio_api_key,
base_url=endpoint_url,
default_headers={"id": request_id}
)
# Define model and prompt
MODEL_NAME = "gemma-3"
PROMPT = "What is quantization in GenAI models?"
print(f"User: {PROMPT}\n")
print("AI Assistant: ", end="", flush=True)
# Create a streaming completion request
stream = client.chat.completions.create(
model=MODEL_NAME,
messages=[
{
"role": "system",
"content": "You are a helpful AI assistant."
},
{
"role": "user",
"content": PROMPT
}
],
max_tokens=512, # Response length limit
stream=True, # Enable streaming for faster first token
)
# Process the streamed response
for chunk in stream:
text_delta = chunk.choices[0].delta.content
if text_delta:
print(text_delta, end="", flush=True)
print() # Add newline after response
except Exception as e:
print(f"An unexpected error occurred: {e}")
```
Remember to replace `"YOUR_API_KEY"` and `YOUR_MODEL_ENDPOINT` with the actual API key and model endpoint you generated in the previous steps.
1. Navigate to **Settings > API Keys** from the main sidebar
2. Click **Generate New Key**
3. Provide a descriptive name for your key (must be unique)
4. Set an appropriate expiration date
5. Copy the generated API key (you won't be able to see it again)
 Keep your API key secure and never expose it in client-side code or public repositories.
1. Install the OpenAI Python client if you haven't already:
```shell theme={null}
pip install openai
```
2. Run your script:
```shell theme={null}
python inference.py
```
3. You should see the model's response to your query streaming in your terminal!
Congratulations! 🎉 You've successfully made your first API call to a Shakti Studio
model.
## Understanding Serverless vs. Dedicated Endpoints
In this quickstart, you used a **serverless endpoint** - a pre-deployed model that's available to all Shakti Studio users. While convenient for testing and development, serverless endpoints have some limitations:
* Quick to get started and no deployment required
* Easy switching between different models
* Pay-as-you-go pricing
* Limited customization options
* Private to your organisation and optimised for your needs
* Option to choose from a wide range of customisation
* Deploy and scale your proprietary model hassle-free
* Better control over latency, throughput, and costs
## Next Steps
Ready to take your AI implementation further? Try these next steps:
* [Deploy your own dedicated model](/quickstart/deploy) for better performance and customization
* [Fine-tune a model](/quickstart/finetuning) on your own data for improved accuracy
* [Explore the API reference](/api-reference/introduction) for advanced integration options
Keep your API key secure and never expose it in client-side code or public repositories.
1. Install the OpenAI Python client if you haven't already:
```shell theme={null}
pip install openai
```
2. Run your script:
```shell theme={null}
python inference.py
```
3. You should see the model's response to your query streaming in your terminal!
Congratulations! 🎉 You've successfully made your first API call to a Shakti Studio
model.
## Understanding Serverless vs. Dedicated Endpoints
In this quickstart, you used a **serverless endpoint** - a pre-deployed model that's available to all Shakti Studio users. While convenient for testing and development, serverless endpoints have some limitations:
* Quick to get started and no deployment required
* Easy switching between different models
* Pay-as-you-go pricing
* Limited customization options
* Private to your organisation and optimised for your needs
* Option to choose from a wide range of customisation
* Deploy and scale your proprietary model hassle-free
* Better control over latency, throughput, and costs
## Next Steps
Ready to take your AI implementation further? Try these next steps:
* [Deploy your own dedicated model](/quickstart/deploy) for better performance and customization
* [Fine-tune a model](/quickstart/finetuning) on your own data for improved accuracy
* [Explore the API reference](/api-reference/introduction) for advanced integration options