

Deployments are scoped to the active workspace. Use the workspace toggle in the breadcrumb navigation to switch workspaces before creating a deployment. See Workspaces for details.

Initiate New Deployment

From the main menu, select the Deployments tab
  • Click on the Create button to start a new deployment
    • Enter Deployment Name: Provide a unique name for your deployment.
    • Select Cluster: Choose the cluster where you want to deploy your model.
    • Select Model: Choose the model you want to deploy from the list.
For all your Private Deployments, select Shakti Studio as the cluster.
Screenshot2025 08 18at4 03 22PM Pn

Configure Infrastructure (Resource Details)

  • Choose the appropriate accelerators for your deployment, such as GPUs/CPUs.

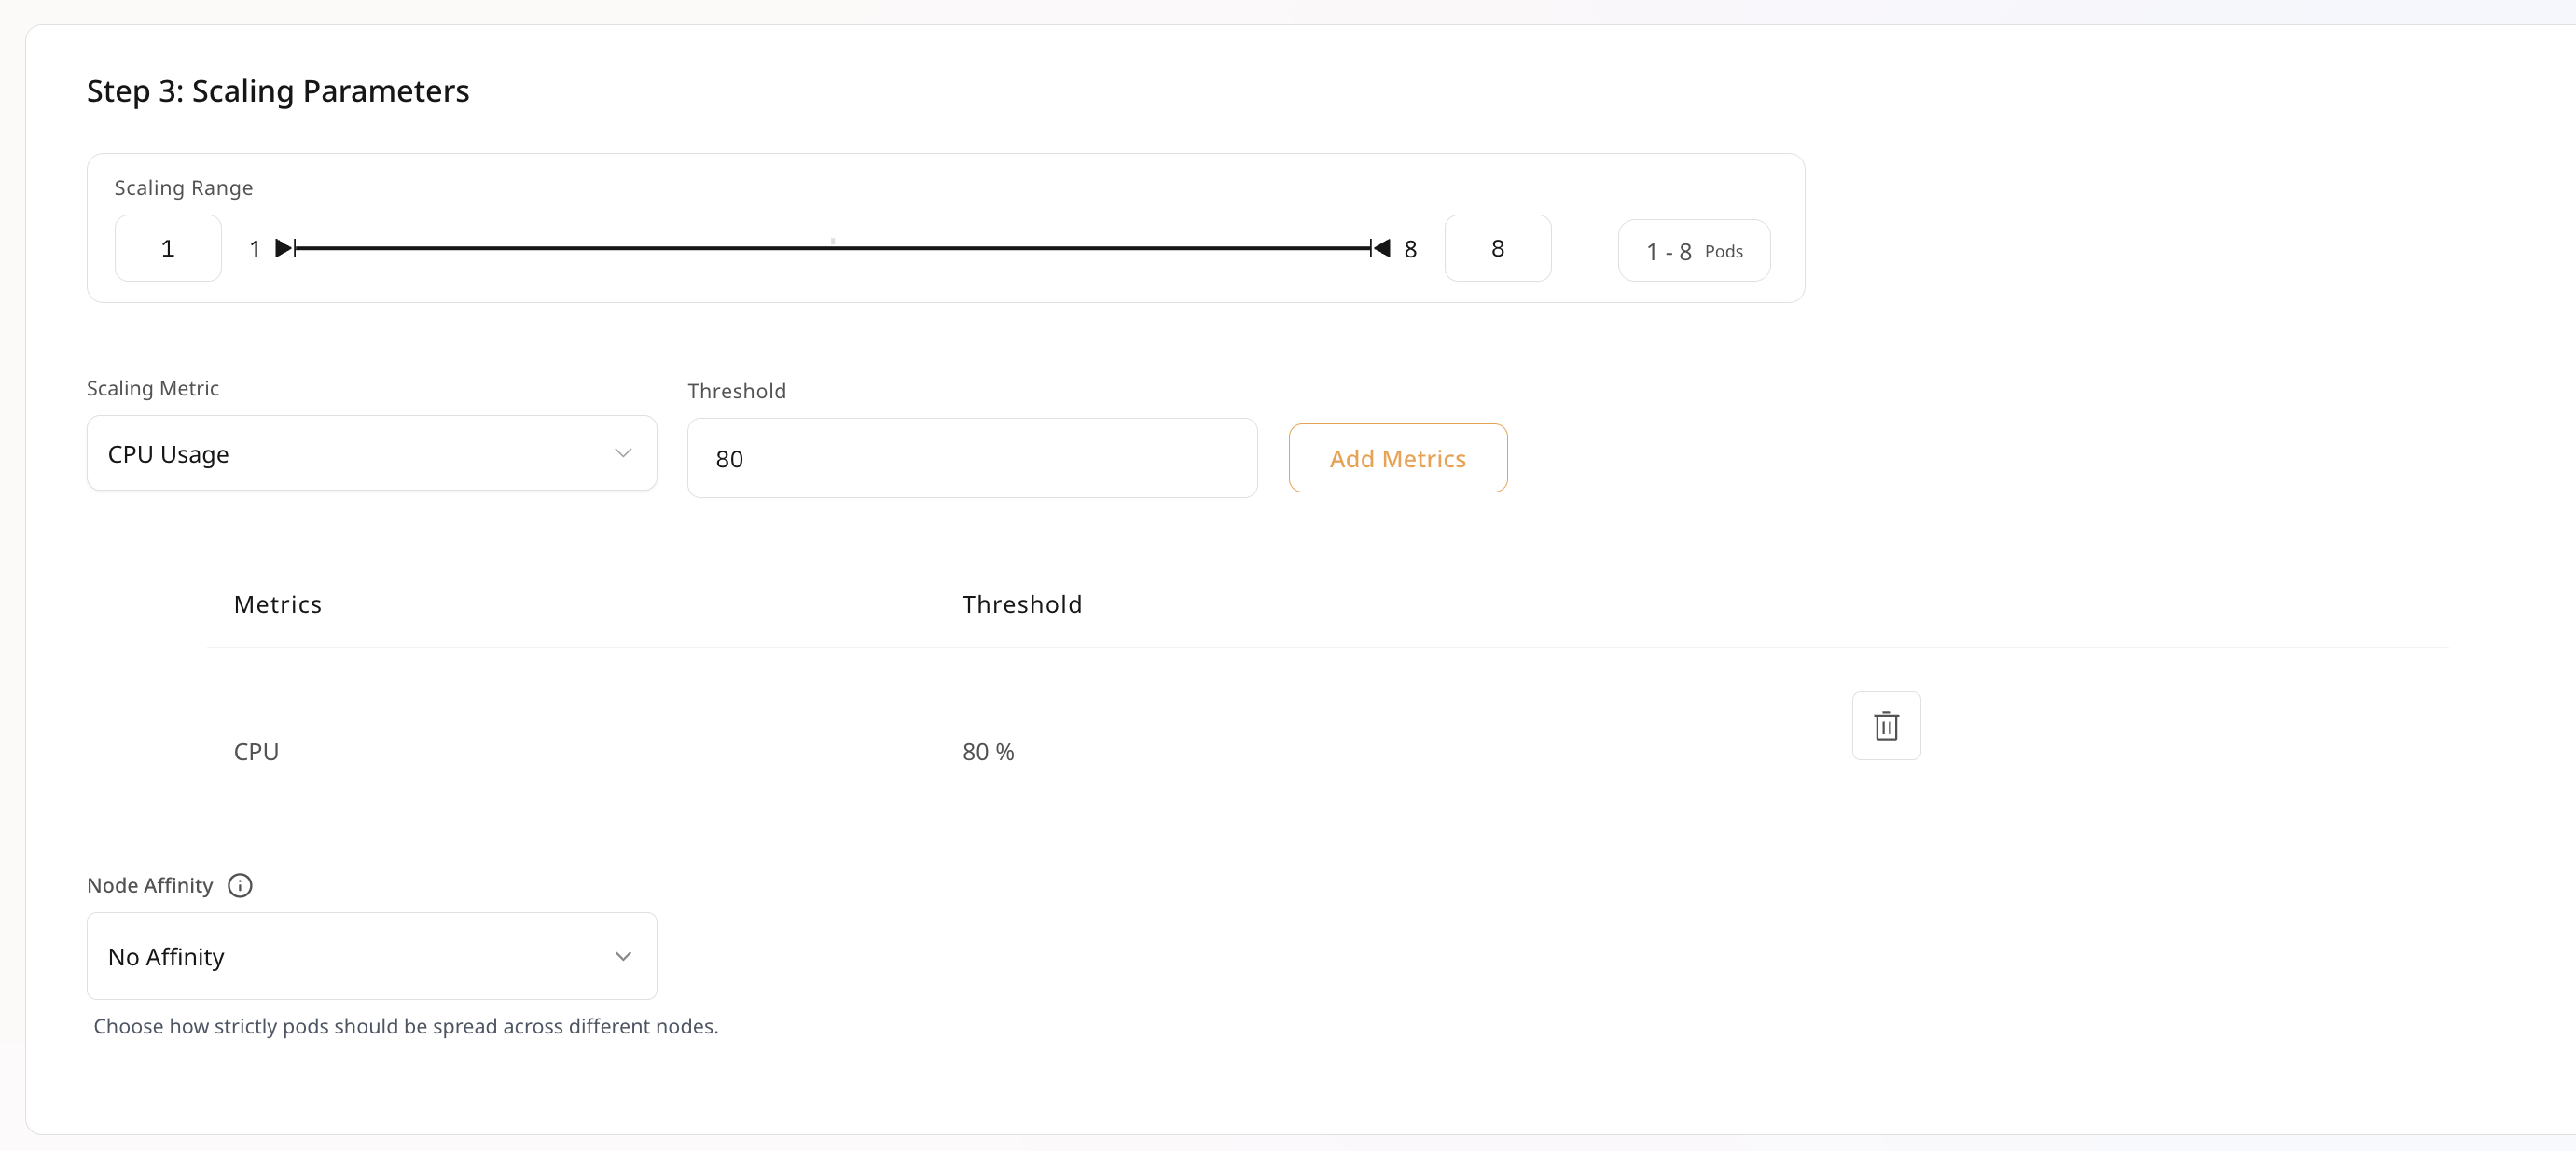
Adding Scaling Metrics

  • Specify the scaling metrics that will be used to auto-scale your deployment.
  • Set the threshold values for each metric to trigger scaling actions.
Screenshot2025 08 17at11 11 56PM Pn

Deploy

  • Click on the Deploy Model button to initiate the deployment process.
  • Check the right part of the screen to see the creation status of your deployment.
  • Monitor the deployment status to know when the model is ready for usage.
  • The status will show deployed once done. Your model is now ready for use.

SSH Access

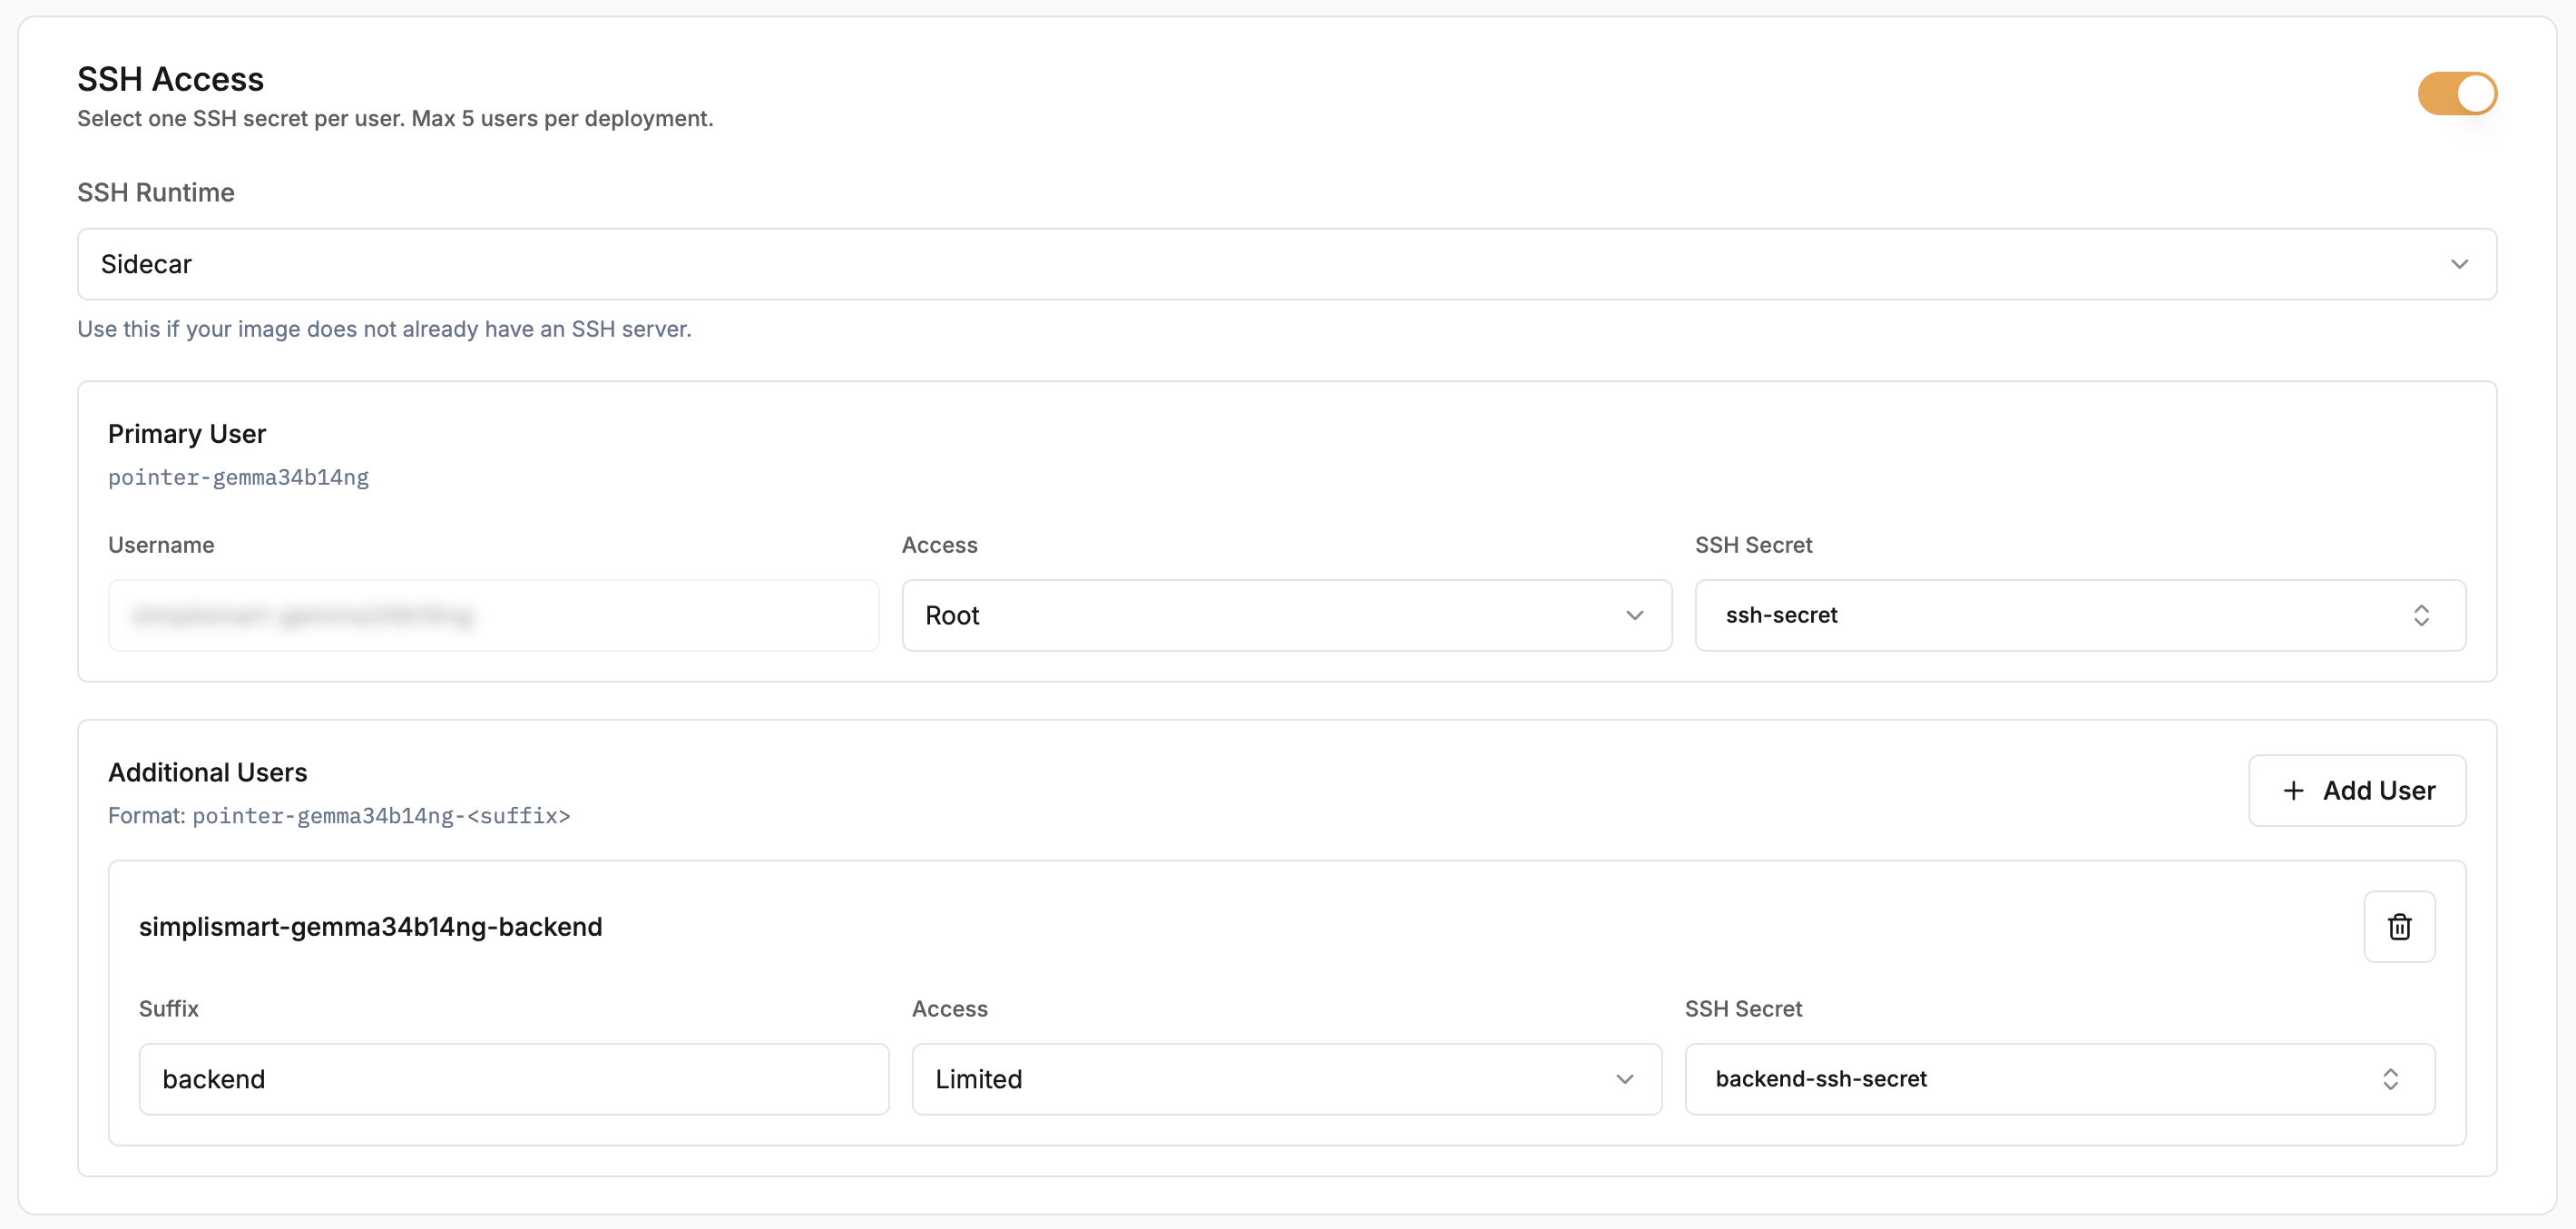
SSH access lets you connect directly to a running container in your deployment, which is useful for debugging, inspecting logs, or running ad-hoc commands without rebuilding and redeploying. SSH Access Toggle SSH Access on during deployment creation to configure it. Up to 5 users per deployment are supported.
SSH Runtime

The SSH Runtime dropdown controls how SSH is served:
  • Sidecar: Shakti Studio injects a sidecar container that handles SSH. Use this if your image does not already include an SSH server. No changes to your Dockerfile are required.
  • Main Container: SSH runs inside your primary container. Use this when you are bringing your own image that already has openssh-server installed and configured.

Users

Primary User is created automatically. The username is derived from your deployment slug (e.g. <YOUR-ORG-NAME>-<DEPLOYMENT-SLUG>) and gets Root access by default. Additional Users follow the format <YOUR-ORG-NAME>-<DEPLOYMENT-SLUG>-<SUFFIX> and are granted Limited access. You can add up to 4 additional users alongside the primary user. Each user is associated with an SSH Secret, a Kubernetes secret holding the authorized public key for that user.

Bringing Your Own Image with SSH

If you select Main Container as the runtime, your image must have openssh-server installed and sshd configured to start on launch. Below is a reference Dockerfile:
FROM nvidia/cuda:13.0.0-runtime-ubuntu24.04

RUN apt-get update && \
    apt-get install -y --no-install-recommends \
        bash \
        openssh-server \
        openssh-client \
        libnss-wrapper && \
    rm -rf /var/lib/apt/lists/*

COPY entrypoint.sh /usr/local/bin/entrypoint.sh
RUN chmod +x /usr/local/bin/entrypoint.sh

RUN set -eux; \
    if ! getent group 1000 >/dev/null; then groupadd -g 1000 appuser; fi; \
    if ! id -u 1000 >/dev/null 2>&1; then useradd -u 1000 -g 1000 -s /bin/bash -M appuser; fi

EXPOSE 2222
USER 1000:1000
ENTRYPOINT ["/usr/local/bin/entrypoint.sh"]
If your environment requires CUDA 12.x, replace the base image in the Dockerfile above with:
FROM nvidia/cuda:12.9.1-runtime-ubuntu24.04
The rest of the Dockerfile remains unchanged.
Create an entrypoint.sh file in the same directory as your Dockerfile. This script initializes the SSH environment and starts the SSH daemon:
entrypoint.sh
#!/bin/bash
set -euo pipefail

# When not the designated ssh sidecar, skip sshd and idle as the main container.
if [ "${SSH_CONTAINER_ROLE:-}" != "sidecar" ]; then
    exec /bin/sleep infinity
fi

RUNTIME="${SSH_RUNTIME_DIR:-/ssh-runtime}"
SSH_UID="${PUID:-1000}"
SSH_GID="${PGID:-1000}"

if [ ! -d "${RUNTIME}" ]; then
    echo "ERROR: SSH runtime dir ${RUNTIME} is missing; ensure the ssh-runtime volume is mounted here" >&2
    exit 1
fi

# SSH_USERNAMES: comma-separated list of all usernames that SSHPiper may forward.
# Each gets a passwd entry so sshd can resolve them (all map to uid/gid 1000).
IFS=',' read -ra USERS <<< "${SSH_USERNAMES:-${SSH_USERNAME:-deployment-user}}"

: > "${RUNTIME}/nss-passwd"
: > "${RUNTIME}/nss-group"

for USER in "${USERS[@]}"; do
    USER="${USER// /}"  # trim spaces
    [ -n "${USER}" ] || continue
    echo "${USER}:x:${SSH_UID}:${SSH_GID}:SSH User:${RUNTIME}/home:/bin/bash" >> "${RUNTIME}/nss-passwd"
done

echo "${USERS[0]}:x:${SSH_GID}:" >> "${RUNTIME}/nss-group"

NSS_WRAPPER_LIB=$(find /usr/lib -name "libnss_wrapper.so*" -type f 2>/dev/null | head -1)
if [ -z "${NSS_WRAPPER_LIB}" ]; then
    echo "ERROR: libnss_wrapper.so not found — cannot resolve SSH username" >&2
    exit 1
fi

export NSS_WRAPPER_PASSWD="${RUNTIME}/nss-passwd"
export NSS_WRAPPER_GROUP="${RUNTIME}/nss-group"
export LD_PRELOAD="${NSS_WRAPPER_LIB}"

if [ ! -f "${RUNTIME}/sshd_config" ]; then
    if [ -x /ssh-init/05-ssh-init.sh ]; then
        /bin/bash /ssh-init/05-ssh-init.sh
    else
        # main_container mode: no init container pre-runs; self-initialise.
        ssh-keygen -t ed25519 -f "${RUNTIME}/ssh_host_ed25519_key" -N "" -q
        ssh-keygen -t rsa -b 4096 -f "${RUNTIME}/ssh_host_rsa_key" -N "" -q
        chmod 600 "${RUNTIME}/ssh_host_"*

        AUTH_KEYS="${SSH_AUTHORIZED_KEYS_FILE:-${RUNTIME}/home/.ssh/authorized_keys}"
        mkdir -p "$(dirname "${AUTH_KEYS}")"
        [ -f "${AUTH_KEYS}" ] || touch "${AUTH_KEYS}"
        chmod 600 "${AUTH_KEYS}"

        if [ "${SSH_AUDIT_LOGGING:-true}" = "true" ]; then
            cat > "${RUNTIME}/ssh-audit-shell" << 'AUDIT_EOF'
#!/bin/bash
SESSION_ID=$(tr -dc 'a-f0-9' < /dev/urandom 2>/dev/null | head -c8 || printf '%x' "$(date +%s)")
SRC_IP="${SSH_CLIENT%% *}"
TS="$(date -u +%Y-%m-%dT%H:%M:%SZ)"
printf '%s SSH_AUDIT connect user=%s src=%s session=%s\n' "$TS" "$USER" "$SRC_IP" "$SESSION_ID" >&2
if [ -n "${SSH_ORIGINAL_COMMAND:-}" ]; then
  printf '%s SSH_AUDIT exec user=%s src=%s session=%s cmd=%s\n' "$TS" "$USER" "$SRC_IP" "$SESSION_ID" "$(printf '%q' "$SSH_ORIGINAL_COMMAND")" >&2
  exec /bin/bash -c "$SSH_ORIGINAL_COMMAND"
else
  exec /bin/bash -l
fi
AUDIT_EOF
            chmod +x "${RUNTIME}/ssh-audit-shell"
        fi

        SSH_PORT_VAL="${SSH_PORT:-2222}"
        cat > "${RUNTIME}/sshd_config" << EOF
Port ${SSH_PORT_VAL}
HostKey ${RUNTIME}/ssh_host_ed25519_key
HostKey ${RUNTIME}/ssh_host_rsa_key
PidFile ${RUNTIME}/sshd.pid
AuthorizedKeysFile ${AUTH_KEYS}

UsePAM no
PasswordAuthentication no
ChallengeResponseAuthentication no
KbdInteractiveAuthentication no

PermitRootLogin no
AllowTcpForwarding no
AllowAgentForwarding no
GatewayPorts no
X11Forwarding no
MaxAuthTries 3
MaxSessions 2
LoginGraceTime 30
ClientAliveInterval 120
ClientAliveCountMax 2
PermitEmptyPasswords no
PermitUserEnvironment no
PermitUserRC no
PermitTunnel no
PrintLastLog yes
EOF
        if [ "${SSH_AUDIT_LOGGING:-true}" = "true" ]; then
            echo "ForceCommand ${RUNTIME}/ssh-audit-shell" >> "${RUNTIME}/sshd_config"
        fi
    fi
fi

exec /usr/sbin/sshd -D -e -f "${RUNTIME}/sshd_config"
Key requirements:
  • openssh-server must be installed, SSH will not work without it.
  • Password authentication is disabled; only public key auth is accepted.
  • Port 2222 must be exposed.
  • ssh-keygen -A generates the host keys at build time.
  • The CMD optionally runs a bootstrap script (passed via $SSH_BOOTSTRAP_SCRIPT) before starting sshd in the foreground.
The SSH Secret you configure in the Secrets tab must contain the public key that corresponds to the private key you will use when connecting.

Generate an SSH Key Pair

Before creating your deployment, generate a key pair:
ssh-keygen -t ed25519 -f shakti_studio_key
cp shakti_studio_key shakti_studio_key.pem
This produces two files:
  • shakti_studio_key.pem: your private key. Keep this locally; never share it.
  • shakti_studio_key.pub: your public key. Add this to Shakti Studio as an SSH Public Key secret under Integrations → Secrets.
When configuring SSH Access in the deployment form, select that secret from the SSH Secret dropdown for each user.

Connecting to a Running Deployment

Once the deployment status shows deployed, open the deployment detail page. The SSH Access section shows the ready-to-use command pre-filled with your username and host: SSH into container Copy the command and point -i to your .pem private key file:
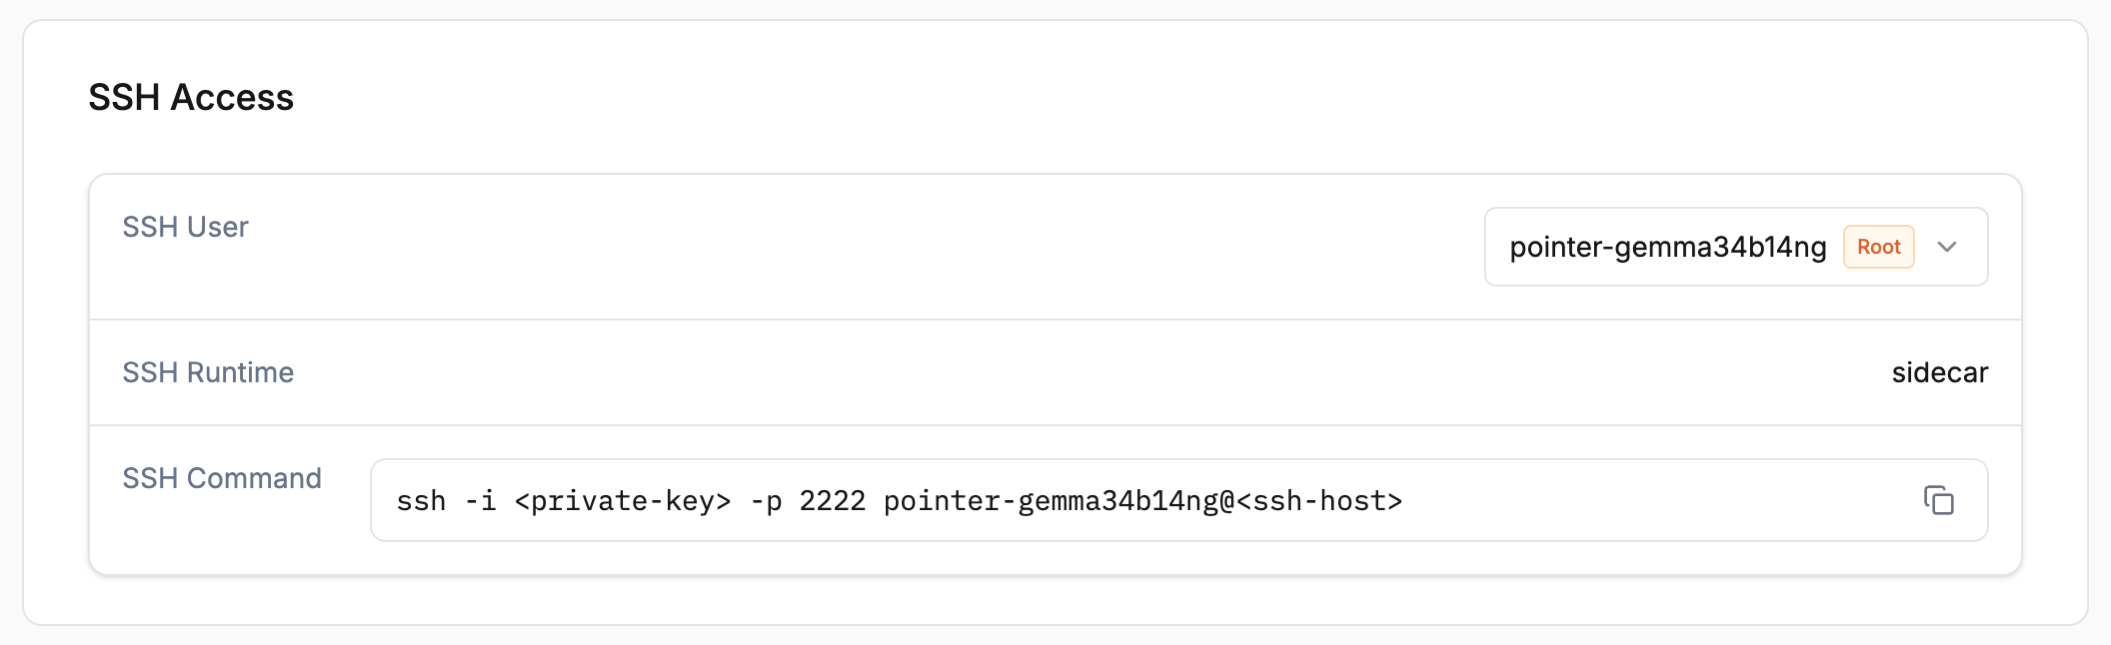
ssh -i shakti_studio_key.pem -p 2222 pointer-<slug>@<YOUR-SSH-HOST>
The panel also displays:
  • SSH User: Auto generated primary username tied to your deployment slug
  • Access Level: root for the primary user, limited for additional users
  • SSH Runtime: sidecar or main_container, as configured at creation